


- 57 -
identify size, cold water temperature LED identifies 5kg, the low water level LED identifies
6kg, the hold spin speed LED identifies 7kg. If the product has not been setup before all 3 LEDs
will be on. To set the size for 5kg push the wash temp up button. To set the size for 6kg push
the water level up button. To set the size for 7kg push the spin speed up button.
Set Model to LW, MW or GW. The model setting of Smartdrive is determined by the hot
water temperature LED, high water level LED and Medium spin LED. If all 3 LEDs are on the
model has never been set before. To select the correct model press the following buttons. The
Wash temperature down button turns only the hot water temperature LED on, this indicates LW.
The Water Level down button turns only the high water level LED on, this indicates MW. The
spin speed down button turns only the medium spin speed LED on, this indicates GW.
Set Phase to Phase 1 to 5. The phase setting of Smartdrive is determined by the last 4 wash
progress LEDs. If all 4 are on the phase has never been set before. The phase may be selected by
pressing the advance button, this will allow the 4 options to be selected. From right to left. The
spin LED indicates that phase 5 has been selected. The display must be connected to a phase 5
motor controller. The rinse2 LED indicates that Phase 3 or 4 has been selected. The display
must be connected to a phase 4 motor controller. The rinse1 LED indicates that Phase 2.5 has
been selected, this is Phase 2 but the product has a reed switch fitted. The display must be
connected to a phase 4 motor controller. The wash5 LED indicates that Phase 1 or 2 has been
selected. This option is for a mechanical lid switch fitted on the display. The display must be
connected to a phase 4 motor controller in Phase 2 or a Phase1.4 motor controller in Phase 1.
Press power to lock the settings into memory. To check the settings, start a cycle.
Incompatible settings will cause the error to recur. If this happens check that the correct model
numbers are fitted.
130. (10000010) Phase 1 to 5 - Single Rotor Position Sensor Error
The Motor Controller has found an error in the pattern received from the Rotor Position Sensor.
The error is an instantaneous error only and is not a permanent fault condition. Likely causes
of this fault are a bad connection on the harness between the Rotor Position Sensor and the
Motor Controller, or a faulty Rotor Position Sensor.
Primary Source - Wiring
Action
1. Check the Rotor Position Sensor with an RPS tester. Or set RESTART off and spin product
to 1000 RPM and lift lid to recreate fault. Replace the Rotor Position Sensor if faulty.
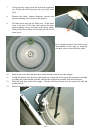
2. Check for corrosion on the edge connector of the Rotor Position Sensor. If faulty replace
sensor or harness.
3. Check the contacts on the Rotor Position Sensor end of the Rotor Position Sensor harness
to see if any have been damaged. (each set of contacts in the socket has two wipers. If the
distance between these wipers varies between different contacts, replace the Rotor Position
Sensor harness).
4. If the Rotor Position Sensor is an old type ensure it is cable tied.