


- 28 -
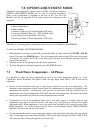
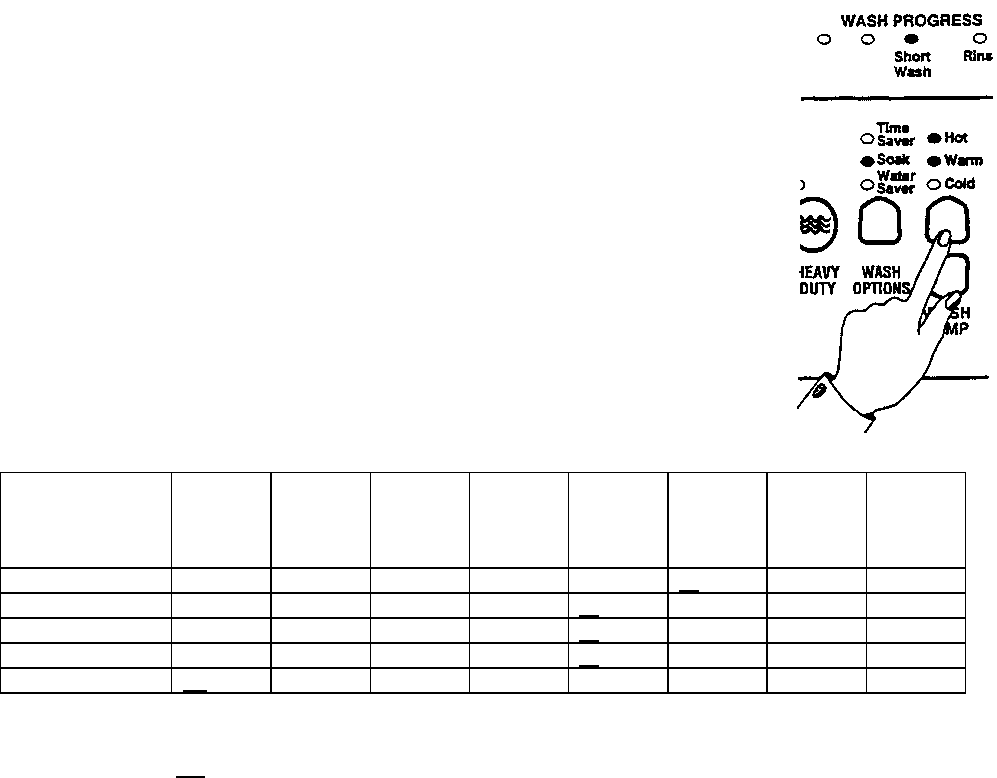
Method of Setting the Wash Temperature
1. Select the OPTION ADJUSTMENT MODE by pressing and holding the START/PAUSE button, then
pressing the POWER button.
2. Use WASH TEMPERATURE buttons and LEDs to select the temperature
setting to be adjusted, i.e. Cold, Cold/Warm, Warm, Warm/Hot, Hot.
3. Use the ADVANCE button and WASH PROGRESS LEDs to increase or
decrease the temperature. Each time the ADVANCE button is pressed, the
WASH PROGRESS LEDs will advance one position to the right. This
increases the temperature by approximately 1
o
C. When the spin LED is on
and the ADVANCE button is pressed, the spin LED will go off and the left
hand (long wash) LED will turn on. This is the coldest setting. The setting can
then be advanced through again to achieve the required temperature.
4. Select the next temperature range to be changed with the WASH
TEMPERATURE button. Repeat Step 3. Each Temperature range can be
adjusted using this method.
5. To return the machine to Normal operation, press the POWER button.
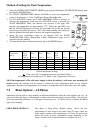
Approximate
Temperature
Range
15 min
Long
Wash
LED on
12 min
Wash
LED on
9 min
Wash
LED on
6 min
Wash
LED on
3 min
Short
Wash
LED on
Rinse
LED on
Final
Rinse
LED on
Spin
LED on
Hot 5556575859
60
61 62
Warm/Hot 46 47 48 49
50
51 52 53
Warm 36 37 38 39
40
41 42 43
Cold/Warm 31 32 33 34
35
36 37 38
Cold
*C
20 21 22 23 24 25 26
Water Temperature Settings
*C Cold water only. Underlined figures are the default settings
All temperatures are expressed in
o
C. Phase 1 and 2 temperatures are lower.
NB. If the temperature of the cold water supply is above the setting, a cold water user warning will
sound because the machine will be unable to control the water temperature down to the required
temperature. Readjust cold temperature to cold only or a temperature that is above the cold water supply.
7.2 Rinse Options – All Phases
Smartdrive may be used in a large number of different installations where the water supplies can vary. In
some areas the water may be contaminated, in others areas the water supply may be limited. Also the user
may have particular preferences as to the type of rinse they use. To cater for these variations the Rinse
type can be changed.
FIRST RINSE OPTION (1) First Rinse is Spray Rinse. Default setting. Gives the best
performance in suds removal and water usage. In areas where the
water supply contains solid contaminates, i.e. bores, the spray rinse
action can result in these contaminates being deposited on the
fabrics. In this case it would be better to use Option (2) or (3).