


2
Tools needed and
Parts Supplied
Assemble the necessary tools and supplies before beginning the
washer installation. Do not re-install into the washer, the
styrofoam that contains the supplied parts.
To connect the drain hose and water inlet hoses
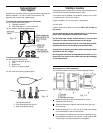
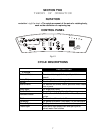
You will need these following tools
1. Flashlight (optional)
2. Pliers (that open to 1 9/16 in (3.95 cm))
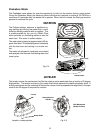
You will need the following supplied parts
To secure the drain hose and level the washer
You will need the following tools
1. Open end wrench (9/16 in.)
2. Level
3. Wood block
4. Ruler or measuring tape
You will need the following supplied parts
1. Tie strap with fastener
2. Front leveling feet with nuts (2)
3. Rear self-adjusting feet (2)
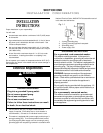
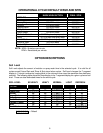
Selecting a Location
Selecting the proper location for your washer improves performance
and minimizes noise and possible washer “walk.”
Your washer can be installed in a basement, laundry room, closet
or recessed area. See “Drain System.”
Proper installation is the consumer’s responsibility.
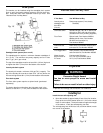
You will need:
A water heater set to deliver a minimum 120º F. (49º C) water to
the washer.
A grounded electrical outlet located within 4 ft. of where the
power cord is attached to the back of the washer.
Hot and cold water faucets located within 4 ft. of the hot and
cold water fill valves and water pressure of 20-100 psi.
A level floor with a maximum slope of 1 inch under entire washer.
Installing the washer on carpeting is not recommended.
A sturdy floor to support the washer with a total weight (water
and load) of 315 lbs, (143kgs).
Do not operate the washer in temperatures below 32º F. (0º C).
Some water can remain in the washer and can cause damage
in low temperatures.
1
3
2
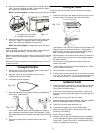
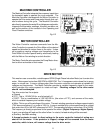
Recessed area or closet installation
The dimensions shown are for the minimum spacing allowed.
Additional spacing should be considered for ease of
installation and servicing.
Additional clearances might be required for wall, door and
floor moldings.
Additional spacing of 1 in. (2.5 cm) on all sides of the washer
is recommended to reduce noise transfer.
If a closet door is installed, the minimum air openings in the
top and bottom of the door are required. Louvered doors with
air openings in the top and bottom are acceptable.
Fig. 1-2
Fig. 1-3
Fig. 1-4