


40
Servicing Components from the Bottom of the Washer
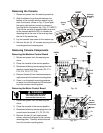
Removing the Drive Motor
1. Disconnect the power from the washing
machine.
2. Carefully lay the washer on its back.
3. Remove the two screws securing the bottom
panel to the washer frame.
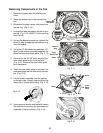
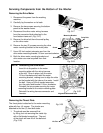
4. Disconnect the drive motor wiring harness
from the connector block attached to the
front bottom frame rail. (Fig. 3-27)
5. Remove the drive belt from the small pulley
on the drive motor.
6. Remove the two (2) screws securing the drive
motor mounting bracket to the motor plate.
7. Use a 3/8 inch socket extension and turn the
drive motor mounting bracket 1/8 turn counterclockwise.
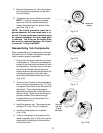
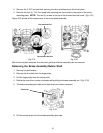
8. Both the drive motor mounting bracket and
drive motor can now be pulled from their
location.
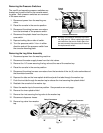
NOTE: Reinstalling the drive motor:
Insert it into its position in the motor
mounting plate with the wiring harness
at the top. Once in place, turn the motor
1/8 turn clockwise and install the motor
mounting bracket, making sure to align the slots
on the bracket with the tabs on the motor. Install
the belt. Using a 3/8 inch socket extension,
turn the motor and bracket 1/8 turn clockwise.
Reinstall the two screws securing the motor
mounting bracket to the motor mounting plate.
Reinstall the wiring harness connector and
harness.
Fig. 3-27
Mounting Bracket
Drive Belt
Screw
Drive Motor
Fig. 3-28
Alignment Slots and Tabs
Screw
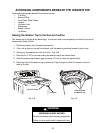
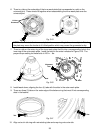
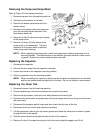
Removing the Thrust Plate
The thrust plate is attached to the motor mounting
plate with four (4) screws. The shocks are
attached to the two (2) front ball studs.
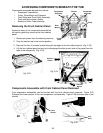
1. The shock must be removed first
by lifting, but not removing the metal clip
with a flat bladed screwdriver. The end
of the shock will now lift off the ball stud.
(Fig. 3-30)
Lift Tab
Fig. 3-29
Fig. 3-30