


Operation Manual Section 5: Installing a transducer assembly
3-9000-744 Rev F September 2013
Installing a transducer assembly while the meter is under line pressure 29
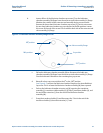
h. Vent the pressure of the extractor tool piston assembly (P) by fully unscrewing
(counterclockwise) the adjustment screw of the pressure regulator (V) until
loose. The piston orifice fitting (Y) will slowly allow pressure to vent from the
extractor tool piston assembly (P). The piston pressure gauge (U) should indicate
zero pressure.
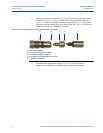
i. Fully close the ultrasonic meter housing line pressure valve (Q) and vent all
pressure from the lubricator chamber assembly (M) by opening the lubricator
chamber vent valve (R). The lubricator chamber pressure gauge (T) should
indicate zero pressure.
j. To check the sealing integrity of the transducer holder (K), close the lubricator
chamber vent valve (R). Wait several minutes and observe lubricator chamber
pressure gauge (T). If no pressure is indicated by the gauge, sealing is successful.
Open the lubricator chamber vent valve (R).
k. If the lubricator chamber pressure gauge (T) indicates pressure in the lubricator
chamber assembly (M) some time after the lubricator chamber vent valve (R) has
been opened to vent pressure and again closed, then the transducer holder (K)
seals may not be sealing line pressure.
EXCESSIVE TORQUE HAZARD
Do not exceed 300 foot-pounds of torque on the extractor rod or the rod nut. Excessive
torque will shear the extractor rod hex nut pin.
Excessive torque applied during operation may cause equipment damage.
SEALING HAZARD
If the transducer holder does not seal, repeat Section 4.1, Step 7, to remove the transducer
holder (K) and replace the seals and/or take other actions as needed to correct the
problem.
Failure to seal line pressure could result in possible personal injury.