


Operation Manual Section 5: Installing a transducer assembly
3-9000-744 Rev F September 2013
Installing a transducer assembly while the meter is under line pressure 27
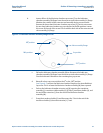
3. Refer to Drawing D-08248 (Appendix C).
a. Connect the quick connect body (AA) on the remaining end of the high pressure
hose to the quick connect stem (FF) on the ultrasonic meter housing line
pressure valve (Q). Customer Supplied - (Refer to Appendix C, Drawings, note Q
typical). Refer to Drawing CE-21063 DETAIL “D” (Appendix C)
b. Open the ultrasonic meter housing line pressure valve (Q) to pressurize the
lubricator chamber to line pressure. Observe line pressure on lubricator chamber
pressure gauge (T) to ensure the lubricator chamber reaches line pressure.
c. Check all joints of the ultrasonic meter housing line pressure valve (Q), high
pressure hose fittings, lubricator chamber assembly (M) and extractor tool valve
assembly (H) for leaks with a leak detecting solution. If any leaks occur
depressurize the extractor tool by closing ultrasonic meter housing line pressure
valve (Q) and open the lubricator chamber vent valve (R). Repair the leaking joint,
close the lubricator chamber vent valve (R) and repressurize the lubricator
chamber as described above.
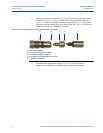
d. Open the extractor tool valve assembly (H) by depressing the valve close stop
button (S) while moving the handle to the full open position. The valve is full
open when the valve handle contacts the valve handle stop peg set screw (HH).
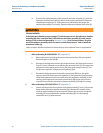
HIGH PRESSURE HAZARD
The ultrasonic meter housing line pressure valve (Q) is to remain closed until both ends of
the high pressure hose are securely connected.
Failure to do so could result in personal injury from explosive forces or sudden whipping of the
line.