


Operation Manual Section 4: Removing a transducer assembly
3-9000-744 Rev F September 2013
Steps to remove a transducer assembly from a meter while the meter is under line pressure 19
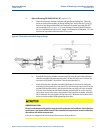
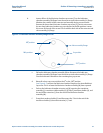
6. Refer to Drawing CE-21064 DETAIL “E” (Appendix C).
a. Connect the quick connect body (AA) on the remaining end of the high pressure
hose to the quick connect stem (CC) on the high pressure (primary) port of the
pressure regulator (V).
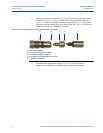
b. Open the ultrasonic meter housing line pressure valve (Q) to pressurize the
lubricator chamber. Continue to pressurize the lubricator chamber until
lubricator pressure gauge (T) indicates the chamber reaches line pressure.
c. Check all joints of the ultrasonic meter housing line pressure valve (Q), high
pressure hose fittings, lubricator chamber assembly (M) and extractor tool valve
assembly (H) for leaks with a leak detection solution.
d. If a leak is detected, immediately stop. Depressurize the extractor tool by closing
the ultrasonic meter housing line pressure valve (Q) and opening the lubricator
chamber vent valve (R).
e. Repair the leaking joint, close the lubricator chamber vent valve (R) and
repressurize the lubricator chamber as described above.
LINE PRESSURE HAZARD
The meter line pressure controls the motion of the exposed lubricator extractor rod.
Moving parts may cause cutting or crushing to extremities during operation.
Failure to keep extremities clear of the extractor rod may cause injury to personnel.
LEAKAGE HAZARD
If a leak is detected, immediately stop and depressurize the extractor tool as described
above.
Failure to repair all leaks could result in personal injury from explosive forces or asphyxiation.