


Operation Manual Section 4: Removing a transducer assembly
3-9000-744 Rev F September 2013
Steps to remove a transducer assembly from a meter while the meter is under line pressure 21
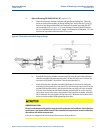
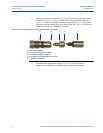
i. Verify all pressure has been vented from the extractor tool piston assembly (P) by
reading the piston pressure gauge (U). Do not proceed until piston pressure
gauge (U) indicates zero pressure, and the extractor rod has stopped moving.
j. Verify that the mark on the extractor rod (N) is visible at the packing gland end of
the lubricator chamber assembly (M). Do not proceed until the extractor rod (N)
is fully retracted to avoid possible transducer assembly (J) damage by closing the
extractor tool valve assembly (H) with the transducer assembly (J) within the ball
of the valve.
k. Close the extractor tool valve assembly (H). The valve handle will automatically
lock the valve in the closed position. If the valve will not close, the transducer
assembly (J) may not be fully retracted. See Step f above.
l. Fully close the ultrasonic meter housing line pressure valve (Q) and vent all
pressure from the lubricator chamber assembly (M) by opening the lubricator
chamber vent valve (R). The lubricator chamber pressure gauge (T) should
indicate zero pressure.
INHALATION HAZARD
Escaping gases released when line is vented may be toxic. Do not inhale the gases vented
to the atmosphere from the pipeline. Do not position yourself directly in front of vented
gases.
Failure to avoid inhaling vented gases may result in injury.