


Operation Manual Section 4: Removing a transducer assembly
3-9000-744 Rev F September 2013
Steps to remove a transducer assembly from a meter while the meter is under line pressure 15
41
Section 4: Removing a transducer assembly
4.1 Steps to remove a transducer assembly from a
meter while the meter is under line pressure
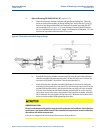
1. Refer to Drawing CE-21060 DETAIL “A” (Appendix C).
a. Fully unscrew the chordset coupling nut (C).
b. Grasp the chordset assembly (A) and pull the chordset assembly away from the
transducer mount (E). This unplugs the chordset socket (B) from the transducer
holder (K). Position the chordset assembly (A) out of the way of the transducer
mount (E) for the duration of the transducer assembly (J) removal and
installation.
2. Refer to Drawing CE-21061 DETAIL “B” (Appendix C).
a. Check to make sure the extension (L) fits into the extractor tool valve assembly
(H) without catching.
b. Slide the male T end of the extension (L) into the T-slot in the hexagon end of the
transducer holder (K). Align the extension (L) with the transducer holder (K).
HIGH PRESSURE HAZARD
The ANSI pressure rating is stamped on the extractor tool flange. The customer is required
to provide site line pressure. Do not exceed the maximum pressure rating of the extractor
tool.
Exceeding the extractor tool pressure rating may cause personal injury from explosion.
FAULTY EXTRACTOR TOOL INSTALLATION
Do not loosen transducer holders under line pressure without the extractor tool fully
installed.
Loosening the transducer holders at full pressure may cause thread damage and leaks.