


6-9
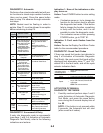
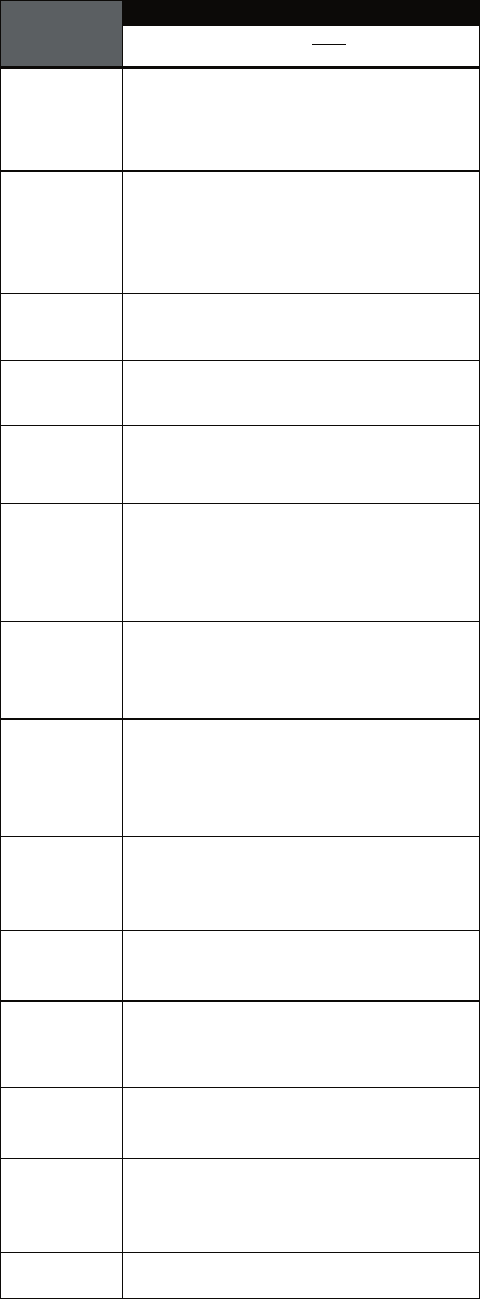
TROUBLESHOOTING GUIDE
PROBLEM
POSSIBLE CAUSE/TEST
NOTE: Possible Cause/Test must be performed in
the sequence shown for each problem.
WON’T POWER
UP
(No response
when buttons
are pressed.)
1. Supply connections. See TEST #1.
2. Unplug washer or disconnect power.
3. Check harness connections.
4. User interface assembly. See TEST #4.
WON’T START
CYCLE
(No response
when Start
button is
pressed.)
1. Supply connections. See TEST #1.
2. Unplug washer or disconnect power.
3. Check harness connections.
4. User interface assembly. See TEST #4.
WON’T SHUT
OFF WHEN
EXPECTED
1. User interface assembly. See TEST #4.
2. Lid switch. See TEST #8.
CONTROL
WON’T ACCEPT
SELECTIONS
User interface assembly. See TEST #4.
WON’T
DISPENSE
3. Log valve. See TEST #2.
1. Check water connections to machine.
2. Check for plugged screen in water source.
WON’T FILL
1. Check water connections to machine.
2. Check for plugged screen in water source.
3. Log valve. See TEST #2.
4. Unplug washer or disconnect power.
5. Check harness connections.
OVER FILLS
1. Unplug washer or disconnect power.
2. Check pressure hose connections.
3. Check to see if the pressure hose has a hole,
is pinched or plugged..
4. Water level and calibration. See TEST #6.
WON’T
AGITATE
1. Make sure basket is floating.
2. Unplug washer or disconnect power.
3. Check harness connections.
4. Lid switch. See TEST #8.
5. Motor. See TEST #3.
WON’T SPIN
1
Lid switch. See TEST #8.
2. Unplug washer or disconnect power.
3. Check harness connections.
4. Motor. See TEST #3.
WON’T DRAIN
1. Check drain hose installation.
2. Check for plugged drain hose.
3. Drain pump. See TEST #7.
INCORRECT
WATER
TEMPERATURE
1. Check for swapped water connections to
1. ATC thermistor stuck in high resistance range.
machine.
2. ATC (Automatic Temperature Control).
See TEST #5.
ALL HOT FILLS
2. ATC (Automatic Temperature Control).
See TEST #5.
WON’T
RECIRCULATE
WATER
1. Unplug washer or disconnect power.
2. Check for plugged recirculation hose.
3. Check for leaks in recirculation system.
4. Recirculate pump. See TEST #7.
DISPLAY IS
FLASHING
See “Display Fault/Error Codes.”
TROUBLESHOOTING TESTS
TEST #1 Supply Connections
This test assumes that proper voltage is pres-
ent at the outlet.
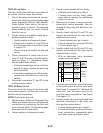
1. Unplug washer or disconnect power.
2. Access the machine/motor control as-
sembly. See Accessing & Removing the
Electronic Assemblies.
3. With an ohmmeter, check for continuity
between the neutral (N) terminal of the
plug and P13-1 on the machine/motor
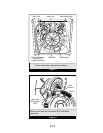
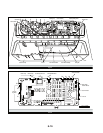
control. See Figures 3 and 4, page 6-16.
If there is continuity, go to step 4.
If there is no continuity, replace the
power cord.
4. In a similar way, check the continuity be-
tween the L1 terminal of the plug and
P13-3 on the machine/motor control. See
Figures 3 and 4, page 6-16.
If there is continuity, go to step 5.
If there is no continuity, replace the
power cord.
5. Visually check that the P10 connector is
inserted all the way into the machine/mo
-
tor control.
6. Visually check that the user interface as-
sembly is properly inserted into the front
console.
7. If both visual checks pass, replace the
user interface assembly. See Reinstall
-
ing the Electronic Assemblies.
8. Plug in washer or reconnect power.
9. Activate the Console and Indicators Di
-
agnostic Test mode to verify repair.
10. If indicators still do not light, the machine/
motor control has failed:
Unplug washer or disconnect power.
Replace the machine/motor control as
-
sembly.
Plug in washer or reconnect power.
•
•
•
•
•
•
•