


6-4
DIAGNOSTIC GUIDE
Before servicing, check the following:
Make sure there is power at the wall outlet.
Has a household fuse blown or circuit break-
er tripped? Time delay fuse?
Are both hot and cold water faucets open
and water supply hoses unobstructed?
All tests/checks should be made with a
VOM (volt-ohm-milliammeter) or DVM (digi
-
tal-voltmeter) having a sensitivity of 20,000
ohms per volt DC or greater.
NOTE: Avoid
using large diameter probes when check
-
ing harness connectors as the probes may
damage the connectors upon insertion.
Check all connections before replacing
components. Look for broken or loose
wires, failed terminals, or wires not pressed
into connectors far enough.
A potential cause of a control not function-
ing is corrosion on connections. Observe
connections and check for continuity with
an ohmmeter.
Connectors: Look at top of connector.
Check for broken or loose wires. Check
for wires not pressed into connector far
enough to engage metal barbs.
Resistance checks must be made with
washer unplugged or power disconnected.
DIAGNOSTIC TESTS
There are three diagnostic test modes avail-
able: Automatic, Manual, and Console. These
tests allow the factory or service personnel to
test and verify all inputs to the machine/motor
control. You may want to allow the automatic
test cycle to complete prior to going into spe
-
cific troubleshooting tests.
•
•
•
•
•
•
•
•
If this test mode has been entered suc
-
cessfully, all indicators on the console
are illuminated for 5 seconds with
88
showing in the Estimated Time Re
-
maining two-digit display.
If indicators do not display as de
-
scribed above, the press/hold/release
procedure above may not have been
performed within the time frame neces
-
sary for successful entry. Repeat step
2 to ensure this was not the cause. If
still unsuccessful, see Diagnostic: Un
-
successful Entry.
3. The program then checks for saved fault
codes:
If there are saved fault codes, see Di-
agnostic: Saved Fault Codes.
If there are no saved fault codes, all
indicators on the console will momen
-
tarily turn off, then turn back on with
88
displayed. After 5 seconds, the Auto
-
matic test begins.
•
•
•
•
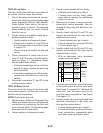
Press/hold
3 seconds
Release for
3 seconds
Press/hold
3 seconds
Release for
3 seconds
Press/hold
3 seconds
ACTIVATION OF AUTOMATIC
DIAGNOSTIC TEST MODE
1. Be sure the washer is in standby mode
(plugged in with all indicators off, or with
only the Clean indicator on).
2. Select any one button (except POWER,
START, and PAUSE/CANCEL) and fol
-
low the steps below, using the same but
-
ton (remember the button):