


6-5
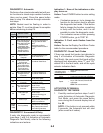
Two-Digit
Indicator
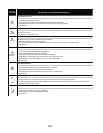
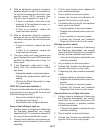
Machine Function Recommended Procedure
C0
Slow spin to 23 rpm.
If no spin go to Manual: Motor,
Spin.
C1
Warm water fills through
Fresh and Detergent
valves, then Fresh valve
until basket floats
(disengages); then
washer continues filling
through Fresh and
Detergent valves to
minimum water level.
If no water or fill temperature is
wrong, go to Manual: Water
Valves.
If basket does not float or
disengage, determine cause of
friction.
C2
Cold water fills through
Bleach valve for
10 seconds.
If no water in bleach cup go to
Manual: Water Valves.
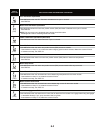
C3
Hot water fills through
Fabric Softener valve
for 10 seconds.
NOTE: Step will occur
but no water can be
dispensed with models
that do not have a
fabric softener valve.
If no water in fabric softener cup
go to Manual: Water Valves.
C4
Warm water fills through
Detergent valve for
10 seconds.
If no water in detergent cup
go to Manual: Water Valves.
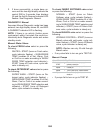
C5
Agitate for 15 seconds.
If no wash action go to
Manual: Motor, Agitate.
C6
Recirculate for
10 seconds.
If water is not being recirculated
go to Manual: Pumps.
C7
Drain to basket engaged
plus timed drain for
10 seconds.
If water is not draining go to
Manual: Pumps.
If basket does not engage
determine cause of friction.
C8
Drain & slow spin
23 rpm.
If drain pump is not on go to
Manual: Pumps.
If basket is not turning go to
Manual: Motor.
C9
Coast to 0 rpm.
If basket does not stop spinning
within 5 seconds, press PAUSE/
CANCEL and restart test.
(none)
(Test
ends)
End of cycle beep.
If no end of cycle beep, make sure
cycle signal is on. From Setting
Mode, pressing buttons should
sound valid key press beep.
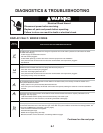
DIAGNOSTIC: Unsuccessful Entry
If entry into diagnostic mode is unsuccessful
(see steps 1 and 2 of Activation of Automatic
Diagnostic Test Mode), refer to the following
indications and actions:
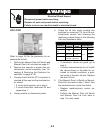
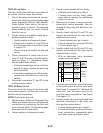
DIAGNOSTIC: Automatic
Performs a five-minute automatic test with wa
-
ter functions to check major washer functions
(door can be open). Press the same button
used in step 2 to advance through automatic
test steps.
NOTE: Basket must be floating in order to
agitate. Step C1 must be allowed to complete
before advancing to step C5.
Press and release the
same button used to
activate Diagnostics
•
•
•
•
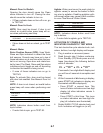
Second most recent fault code is
displayed.
Repeat Third most recent fault code is displayed.
Repeat Fourth most recent fault code is displayed.
Repeat
All indicators momentarily turn off, then
stay on. After 5 seconds, Automatic test
cycle begins.
NOTE:Fault codes are retained.
Indication 1: None of the indicators or dis-
play turns on.
Action: Press POWER button to enter setting
mode.
If indicators come on, try to change the
function for the button used to activate
the diagnostic test mode. If that button
fails to change the function, something
is faulty with the button, and it is not
possible to enter the diagnostic mode.
If no indicators come on after pressing
POWER button, go to TEST #1.
Indication 2: Fault code flashes from the
display.
Action: Review the Display Fault/Error Codes
table for the recommended procedure.
DIAGNOSTIC: Saved Fault Codes
If there are saved fault codes (as indicated in
step 3 of Activation of Automatic Diagnostic
Test Mode), the most recent fault code will be
displayed and alternately show “F” and “XX”
where XX is the fault code, and all the cycle
selector indicators flash.
•
•
ACTIVATION OF MANUAL
DIAGNOSTIC TEST MODE
1. Carefully read and perform steps 1 and 2
under Activation of Automatic Diagnostic
Test Mode, and press the same button
once during the 5 second display time of
the 88.
NOTE: If the button is not pressed within
5 seconds, the Automatic test will start
(after saved fault codes).