


504509 13
Step 6:
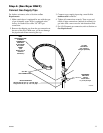
Connect Dryer Exhaust System
For further assistance refer to Sections on Location
Requirements and Dryer Exhaust Requirements.
• DO NOT use plastic or thin foil flexible ducting.
• Locate unit so exhaust duct is as short as possible.
• Be certain old ducts are cleaned before installing your
new dryer.
• Use 4" (10.2 cm) diameter rigid or flexible metal duct.
• Use as few elbows as possible.
• Use duct tape on all joints.
• Failure to exhaust dryer properly will void
warranty.
NOTE: Venting materials are not supplied with the
unit (obtain locally).
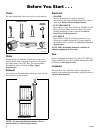
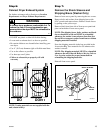
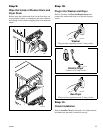
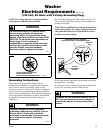
Step 7:
Remove the Shock Sleeves and
Shipping Brace (Washer Only)
Remove front access panel by removing the two screws.
Remove bolts and washers from shipping brace with
9/16" wrench and remove brace. Remove shock sleeves
by pulling on the yellow rope.
Remove label from front side of front access panel and
place on backside of front access panel.
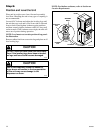
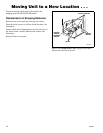
NOTE: The shipping brace, bolts, washers and shock
sleeves should be saved and MUST be reinstalled
whenever the washer is moved more than four feet.
Do not lift or transport washer from front or without
shipping materials installed.
Store the shipping materials in the bag provided in the
Accessories Bag. Save materials for use whenever the
washer is moved.
NOTE: The shipping materials MUST be reinstalled
whenever the unit is moved. Refer to Moving Unit to a
New Location section for proper instructions on
reinstalling the shipping materials.
Reinstall front access panel.
A clothes dryer produces combustible lint. To
reduce the risk of fire and combustion gas
accumulation the dryer MUST be exhausted to
the outdoors.
W116
WARNING
DON'T
H094IE1A
DO
H092IE1B
H027IE1B
HOOKED
END OF
SHIPPING
BRACE
BOLTS
SHOCK SLEEVES
MOTOR
MOUNT
WASHERS