


450260-1 www.amdry.com 23
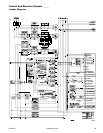
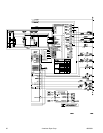
Blower (Squirrel Cage Fan) Electrical
Components _________________________
Blower (Squirrel Cage Fan) Controls
and Overloads
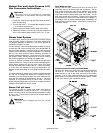
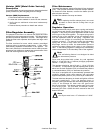
Thermal Magnetic Starter (TMS) Description
The TMS is used as a safety device to manually disconnect
the motor, thereby protecting the motor from being damaged
in a locked rotor condition. The overload has a dial setting on
the face of the device. To set the overload, refer to your specific
electrical diagram. The overload is specifically designed for
motor applications. It has a current curve built into it so the
initial high current draw by the motor will not trip the overload.
On the face of the overload there are two (2) push buttons, a
"START" and a "STOP" or a dial with ON (1) and OFF (0).
The overload must be in the "START" or ON mode for the
motor to run.
Thermal Magnetic Starter (TMS) Replacement
1. Discontinue electrical service to the dryer.
2. Mark L1, L2, L3 and T1, T2, T3 on the wires to the TMS
for correct reinstallation.
3. Set the amp (amphere) rating on the TMS according to
the electrical schematic supplied with your dryer.
4. To remove the thermal magnetic starter, pull the tab on
the bottom of the TMS, and lift upward.
5. To install new TMS, reverse Step # 4 through Step #2.
6. Reestablish electrical service to the dryer.
Auxiliary Contact Block Description
The auxiliary contact block is mounted on the side of the
overload. Its function is to sense an overload trip, thereby
triggering a safety fault which will disable the drying cycle. A
motor overload fault message will appear on the display.
Auxiliary Contact Block Replacement
1. Disconnect electrical service to the dryer.
2. Remove the TMS from the din rail by pulling the tab on
the bottom of the contact block and lift upward.
3. Remove the two (2) wires going to the auxiliary contact
block and label for correct reinstallation.
4. There are two (2) types of auxiliary contact blocks: one
style has a screw and the other style has a clip. In both
styles, disassembly and assembly is recommended
with the TMS in the "STOP" position. To remove the
style that has the screw from the TMS, simply remove
the screw. To remove the style that has the clip, simply
push the clip and twist the auxiliary contact block to
remove.
5. To install new auxiliary contact block, reverse above
procedure (Step # 4 through Step #2).
6. Reestablish electrical service to the dryer.
8. Secure/tighten the bolts from the motor to the motor
base.
9. Reinstall the belt guard removed in Step #2.
10. Reestablish electrical service to the dryer.
Blower Shaft Replacement
The procedure to replace the blower shaft is the same
procedure used to replace the shrouded pillow block bearing.
(Refer to page 22.)
Impor tant
Make certain that the blower (squirrel cage fan) rotates
(spins) freely.
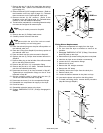
17. Reinstall the blower funnel removed in Step #7.
18. Reinstall the bushing and the pulley removed in Step
#13: line up the bushing to the mark on the blower
shaft, then secure/tighten the setscrew. Reinstall the
bolts into the original holes and tighten evenly for correct
pulley installation.
19. Reposition the blower motor to its' original position:
tighten (hand tight only) the bolts into the motor and the
motor base. Slide the blower motor forward. Align the
pulleys before installing the V-belts (use straight edge
to confirm alignment).
Impor tant
Do not overtighten v-belts.
20. When the V-belts are properly tensioned, secure/tighten
the blower motor to the motor base.
21. Reinstall the belt guard removed in Step #2.
22. Reestablish electrical service to the dryer.
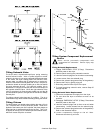
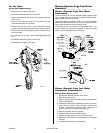
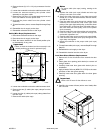
Blower (Squirrel Cage Fan)
Replacement
Caution
The blower (squirrel cage fan) is located in the lint
compartment. Properly lock and tag out the
electrical service before entering the lint compartment.
1. Discontinue electrical service to the dryer.
2. Remove both lint drawers.
3. Remove the eight (8) 1/4-20 bolts which secure the
blower funnel to the blower housing assembly.
4. Remove the blower funnel.
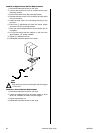
5. Remove the two (2) left hand jam nuts and the washers.
6. Remove the blower (squirrel cage fan) along with the
3/8" x 3/8" x 3" key from the blower shaft.
Note
Install the 3/8" x 3/8" x 3" key on to the blower shaft
before installing the blower (squirrel cage fan).
7. To install new blower (squirrel cage) fan, reverse Step
#6 through Step #1.
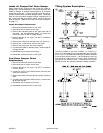
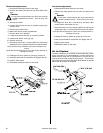
V-Belt Replacement
1. Discontinue electrical service to the dryer.
2. Remove the belt guard.
3. Loosen the bolts securing the blower motor to the motor
base; ease off on the tension bolt.
4. Slide the blower motor forward.
5. Remove and replace V-belts.
Note
For proper belt replacement, the V-belts should be
replaced in matched sets (both belts).
6. Tighten/secure the tension bolt.
Impor tant
Do not overtighten v-belts.
7. Using a straight edge, make certain that the motor pulley
and the V-belts are properly aligned.
!
!
!
!
!
!