


Chapter 7O Agilent 10737L and Agilent 10737R Compact Three-Axis
Interferometers
Procedure
7O-22 User’s Manual
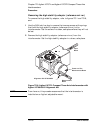
6 Tilt the reference mirror by adjusting the 2-56 screws until the beam
from the reference mirror autoreflects back to the center of the laser
small aperture.
7 Remove the alignment aid.
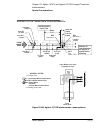
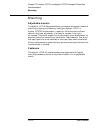
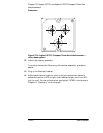
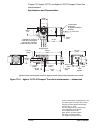
8 Check the position of the beams in the interferometer’s output
apertures (see Figure 7O-9).
Once again, translucent tape is helpful for viewing the beams in the
apertures. If any beam clipping occurs, or if the beams are far off from
the desired location, check for obstructions and recheck the alignment
(by performing steps 6 through 10 above).
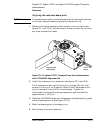
9 Install the receiver assembly.
To do this, reverse the “Removing the receiver assembly” procedure,
above.
10 Plug in the fiber-optic cables.
11 Adjust each receiver’s gain by turning its gain adjustment screw to
cause the receiver’s LED to light, then reduce the gain until the LED
just turns off. For more information, see Agilent 10780F instructions in
Chapter, 8, “Receivers,” of this manual.
12 Unblock the stage mirror beams.
Comparing beam path alignments
1 Remove the receiver assembly.
2 Look for any lack of overlap between the reference and measurement
return beams, translucent tape will help. If beams do not overlap,
check reference mirror alignment.
Note that if you must realign the measurement mirror, you will also
have to realign the reference mirror.
3 Install the receiver assembly and make sure all screws are tight.