


Installation
19
M414905
© Copyright, Alliance Laundry Systems LLC – DO NOT COPY or TRANSMIT
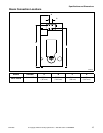
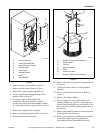
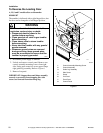
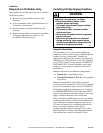
Figure 4
2. Remove the drive guard. Refer to Figure 4.
3. Remove the drive belts. Refer to Figure 4.
4. Remove the cylinder pulley and shaft key.
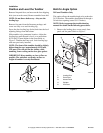
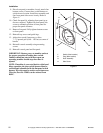
5. Pull the cylinder out through the front of the
tumbler. Refer to Figure 3.
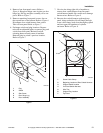
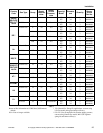
6. To ensure proper cylinder balance for
reassembly, mark each channel’s original
location on cylinder head and number of shims
for each channel before removal. Refer to Figure
5.
7. Remove the complete idler assembly.
8. Remove the trunnion housing. Refer to Figure 4.
9. Disconnect the motor harness(s).
Figure 5
10. Remove the motor(s) and motor bracket(s). Refer
to Figure 4.
11. Unbolt and remove the two vertical trunnion
channels.
12. Remove the junction/contactor box. Refer to
Figure 4.
13. Remove the exhaust thimble.
14. The gas supply line may require removal if it
extends past the rear panel. If so, disconnect the
union located between the gas and shutoff valves
and remove the assembly out through the front of
the tumbler.
15. Remove the tumbler from the crate base and slide
it through the door, sideways.
16. Refer to the appropriate troubleshooting manual,
installation manual and wiring diagram to
reassemble and install the tumbler correctly.
TMB2016K
1 Trunnion Housing
2 Junction/Contactor Box
3 Vertical Trunnion Channel
4 Cylinder Pulley
5 Drive Guard
6 Exhaust Thimble
7 Motor
8 Motor Bracket
TMB2016
K
1
2
3
4
5
6
7
8
TMB2015K
1 Number of Shims for this Channel
2 Cylinder Head
3 Trunnion
4 Channel Identifier
5 Shims
6 Channel Location
7 Number of Shims for this Channel
X
X
2
1
1
2
3
4
5
6
7