


Installation
M414905
18
© Copyright, Alliance Laundry Systems LLC – DO NOT COPY or TRANSMIT
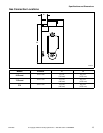
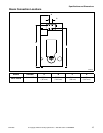
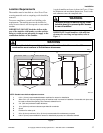
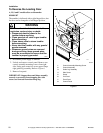
Position and Level the Tumbler
Remove lint panel door, and unscrew the four shipping
bolts (one at each corner). Remove tumbler from skid.
NOTE: Do not throw bolts away – they are the
leveling legs.
Remove four nuts from the literature package, and
screw one fully on to each leveling leg.
Screw the four leveling legs (bolts) back into the level
adjusting fittings from the bottom.
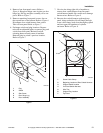
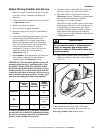
Slide tumbler to its permanent location. Adjust the
leveling legs until the unit is level, or no more than
0.125 inch (32 mm) higher in the front. Refer to
Figure 2. Tumbler must not rock. Lock leveling legs
with nuts previously installed.
NOTE: The front of the tumbler should be slightly
higher than the rear (approximately 0.125 inch,
3.18 mm). This will prevent the clothes, while
tumbling, from wearing on the door glass gasket.
IMPORTANT: Keep tumbler as close to floor as
possible. The unit must rest firmly on floor so
weight of tumbler is evenly distributed.
Figure 2
Bolt-On Angle Option
50 Pound Tumblers Only
This option allows the tumbler depth to be reduced to
34 5/16 inches. The tumbler should then fit through a
36 inch door opening (actual 34 1/2 inches).
NOTE: Refer to appropriate troubleshooting
manual for details on the following procedures.
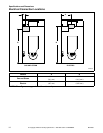
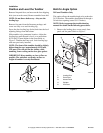
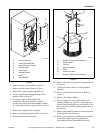
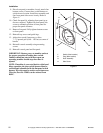
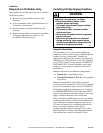
1. Remove the loading door, access panel, front
panel and lint panel. Refer to Figure 3.
Figure 3
T483I
T483I
TMB2014K
1 Loading Door
2 Front Panel
3 Access Panel
4 Cylinder
5 Lint Panel
TMB2014K
1
2
3
4
5