


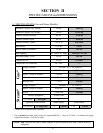

25
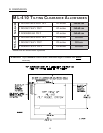
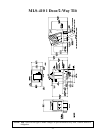
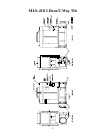
1. Reassembly for the MLG-410 1 Door/Forward Tilt with Sprinkler Gas Model Dryer...
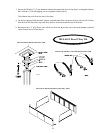
Lift the tumbler (basket) section onto the base...
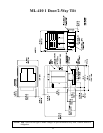
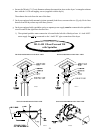
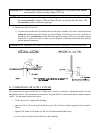
a. Forward tilting dryers have two (2) tilting pistons located in the rear corners of the dryer base and two
(2) piston posts located in the front corners of the dryer base. On the top of the tilting pistons and tilting
posts are clevis block. Use the eight (8) 1/2 x 1-1/4 hex head bolts and lock washers (supplied with
the dryer) to secure each clevis block to the bottom of the tumbler (basket) section.
Refer to Tilting Piston Reconnection View on
page 26.
Refer to Tilting Post Reconnection View on page 26.
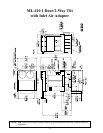
b. The gas line is disconnected at the union when the dryer is shipped in two (2) pieces. This gas line union
is located in the right side of the dryer base. Insert the gas line union half way through the hole on the
bottom of the tumbler (basket) section. Connect the two (2) union halves and retighten.
IMPORTANT: THE FLEX HOSE MUST NOT BE KINKED.
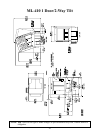
2. There are two (2) electrical reconnections:
a. A plug and cable is located in the right side of the base. This must be lifted up and reconnected into the
mating socket located at the bottom of the right tumbler section.
b. The tumbler section power cable must be lifted up from the base and reconnected into the junction box
next to the tumbler drive motor in the left side of the tumbler section.
Make sure both reconnected cables have enough slack in them to allow the dryer to tilt freely in both
directions.
IMPORTANT: THE RECONNECTED ELECTRICAL CABLES MUST HAVE ENOUGH
SLACK IN THEM TO ALLOW THE DRYER TO TILT FREELY IN BOTH
DIRECTIONS.
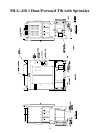
c. Reattach The Tilt Guard Panel...
1) Use the 1/4-20 x 3/8 hex head bolts and lock washers (supplied with the dryer) to secure the top of
the front tilt guard into the bottom of the front of the tumbler (basket) section.
2) Use the 1/4-20 x 3/8 hex head bolts and lock washers (supplied with the dryer) to secure the top of
the rear tilt guard to the bottom of the rear of the tumbler (basket) section.
3) Use the 1/4-20 self-tapping screws (supplied with the dryer) to secure the right side tilt guards and
left side tilt guards.
4) Reconnect the spring and claw assembly which connects the rear tilt guard to each side tilt guard.
5) Reconnect both chains to the back panel...the spring keeps the rear guard close to the dryers back as
the dryer is tilted forward or backwards. (Refer to Tilt Guard Reconnection View on page 26.)