


11
Mounting Rails
Hardware: Front Rail, Rear Rail, (4) M8x16
Socket Head Cap Screws, (4) M8 Flat Washers,
(4) Lock Washers, (2) 1/4-20 x 1-1/2 Hex Cap
Screws, (4) 1/4” Flat Washers, (2) 1/4” Lock
Washers, (2) 1/4” hex nuts.
Tools: 6mm hex wrench, two 13mm wrenches
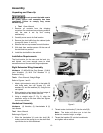
Refer to Figures 4 and 5.
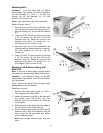
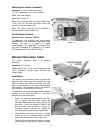
1. Mount the front rail (A) to the underside of the
table (B) with two socket head cap screws (C),
two lock washers (D), and two M8 flat washers
(E).
2. Insert a 1/4-20 x 1/2 hex cap screw (F) through
a 1/4” flat washer (G), the front rail (A) and
extension wing (H). Secure the screw to the
extension wing with a 1/4” washer (G), 1/4”
lock washer (J) and 1/4” hex nut (K).
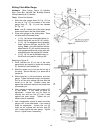
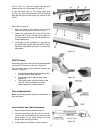
3. Mount the rear rail (L) to the backside of the
table (M) with two socket head cap screws (N),
two lock washers (O) and two M8 flat
washers (P).
4. Insert a 1/4-20 x 1/2 hex cap screw (F) through
a 1/4” flat washer (G), the front rail (A) and
extension wing (H). Secure the screw to the
extension wing with a 1/4” washer (G), 1/4”
lock washer (J) and 1/4” hex nut (K).
Mounting Left Extension Wing with
Miter Slot
Note: If you have a sliding table, skip this section
and proceed to the Mounting Sliding Table section.
Hardware: Left Extension Wing, (4) M10x90
Socket Head Cap Screws, (4) M10 Lock Washer,
(4) Flat Washers
Tools: Cross Point Screw Driver, Straight Edge,
Rubber Mallet, 8mm Hex Wrench
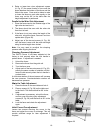
Referring to Figure 6:
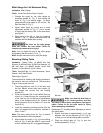
1. Remove the arbor pulley guard (A). This is
only needed for the sliding table.
2. Attach left extension wing (B) to the table with
four socket head cap screws, four lock
washers and four flat washers (C). Snug but
do not tighten.
3. Slide extension wing toward the front edge of
the saw table until two faces are flush.
4. Place a straight edge across the table and left
extension wing. Align the extension wing the
same height as the saw table and tighten
socket head cap screws.
Note: Use a rubber mallet to align wing with
table.
Figure 4
Figure 5
Figure 6