


9001900 73
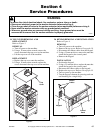
Section 4 Service Procedures
© Copyright, Alliance Laundry Systems LLC – DO NOT COPY or TRANSMIT
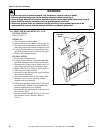
To reduce the risk of electrical shock, fire, explosion, serious injury or death:
• Disconnect electrical power to the washer-extractor before servicing it.
• Close the gas shut-off valve to the washer-extractor (when applicable) before servicing it.
• Never start the washer-extractor with any guards/panels removed.
• Whenever ground wires are removed during servicing, these ground wires must be
reconnected to ensure that the washer-extractor is properly grounded.
W461R1
WARNING
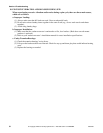
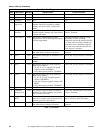
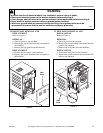
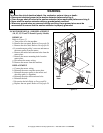
27. WATER VALVE REMOVAL AND
REPLACEMENT
Refer to Figure 12.
REMOVAL
a. Turn off power to the machine.
b. Remove the top cover. Refer to Paragraph 19.
c. Disconnect the water supply hose from the
water valve.
d. Loosen the clamps that attach the hoses to the
top of the water valve.
e. Disconnect the hoses from the top of the water
valve.
f. Remove the screws that attach the water valve
to the upper rear panel.
g. Remove the water valve.
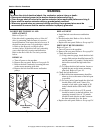
REPLACEMENT
a. Position the water valve on the upper rear
panel.
b. Replace the screws that attach the water valve
to the upper rear panel.
c. Reconnect the hoses to the top of the water
valve.
d. Tighten the clamps that attach the hoses to the
top of the water valve.
e. Reconnect the water supply hose to the water
valve.
f. Replace the top cover. Refer to Paragraph 19.
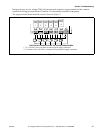
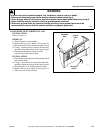
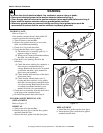
Figure 11
Deflection
Span Length
P044IE3A
Figure 12
CFS15S
Water
Valve
Upper Rear
Panel
Water Supply
Hose