


5-5
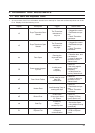
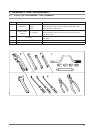
Part Name
Descriptive Picture
How To Do
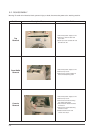
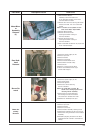
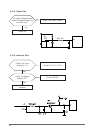
Motor/Blow-
er
Assembly
Removal
(2)
Rear Bulk-
head
Removal
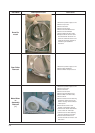
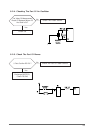
Burner Re-
moval
Heater As-
sembly
Removal
####
13.Slide the Motor Blower.
Assembly toward the heater and
lift to disengage the tabs on the motor
from the slots in the base.
14.Remove the 14mm nut securing the blower
wheel to the shaft. The nut is a left hand
thread.
QRWH=#D#zuhqfk#fdq#eh#sodfhg#rq#erwk##
# # hqgv#ri#wkh#Prwru#Rxwsxw#Vkdiw1
15.Remove Blower Wheel.
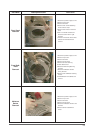
16.Remove the three screws
securing the blower housing to
the motor bracket.
17.Remove the three screws
securing the blower housing to
the motor bracket .
18.Use a wide blade screwdriver to pop off the
motor retentionclamps.
1.Disconnect power supply to unit.
2.Remove Top Cover.
3.Remove Console.
4.Remove Front Panel.
5.Remove Console Back Cover.
6.Remove Belt from Idler Pulley.
7.Remove Drum.
8.Remove 7 screws from the back.
9.Lift the rear bulkhead off the right
and left side hangers.
1.Disconnect power supply to unit.
2.Shut off gas supply.
3.Disconnect gas line.
4.Remove two screws securing
burner to bracket.
QRWH=#Wkh#Ljqlwhu#Edu#lv#iudjloh1#Eh#
# # fduhixo#qrw#wr#gdpdjh#Ljqlwhu#zkhq##
# # uhprylqj#Exuqhu#Dvvhpeo|1
5.Remove the two screws attaching
the housing to the burner bracket.
The screws are recessed from view.
6.Slide Burner Assembly from dryer.
1.Disconnect power supply to unit.
2.Remove Top Cover.
3.Remove Console.
4.Remove Front Cover.
5.Remove Heater Assembly retaining screw.
6.Slide Heater Assembly out the front of dryer.
7.Remove the wiring terminals from the Heater
Assembly.
8.Reinstall by aligning the tabs on the back
bulkhead with the notches in the Heater As
sembly.