


30
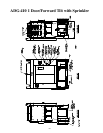
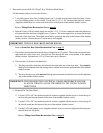
1. Reassembly for the ADS-410 2 Door/2-Way Tilt Steam Model Dryer ...
Lift the tumbler (basket) section onto the base ...
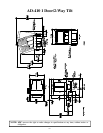
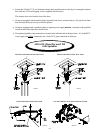
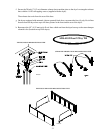
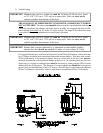
a. 2-way tilting dryers have four (4) tilting pistons, one (1) located in each corner of the dryer base. On the
top of each tilting piston is a clevis block. Use the four (4) 1/2 x 1-1/4” hex head bolts and lock washers
(supplied with the dryer) to secure each clevis block to the bottom of the tumbler (basket) section.
Refer to Tilting Piston Reconnection View on page 31.
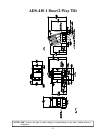
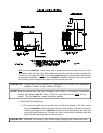
b. Both the 2-inch (5.08 cm) steam supply line and the 1-1/4” (3.18 cm) condensate return line unions are
disconnected when the dryer is shipped in two (2) pieces. The steam supply lines are located in the right
hand side of the dryer base. Insert both union halves up through the holes in the bottom of the tumbler
(basket) section. Connect the two (2) union halves and retighten.
IMPORTANT: THE FLEX HOSE MUST NOT BE KINKED.
Refer to Steam Flex Hose Union Reconnection View on page 31.
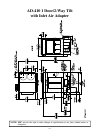
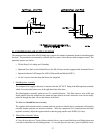
c. The air lines are disconnected when the dryer is shipped in two (2) pieces. The air lines are located in the
right hand side of the dryer base. Insert the air lines through the hole on the bottom of the tumbler
(basket) section. Reconnect the 1/4” (6.35 mm) brass poly connector.
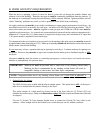
d. There are four (4) electrical reconnections ...
1) The plug and cable connections are located in the right hand side of the dryer base. These must be
lifted up and reconnected into the mating sockets located at the bottom right hand side of the tumbler
(basket) section.
2) The drive motor power cable must be lifted up and reconnected into the drive motor in the right hand
side of the tumbler (basket) section.
IMPORTANT: THE RECONNECTED ELECTRICAL CABLES MUST HAVE ENOUGH
SLACK IN THEM TO ALLOW THE DRYER TO TILT FREELY IN BOTH
DIRECTIONS.
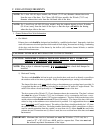
e. Reattach The Tilt Guard Panel ...
1) Use the 1/4-20 x 3/8” hex head bolts and lock washers (supplied with the dryer) to secure the top of
the front tilt guard into the bottom of the front of the tumbler (basket) section.
2) Use the 1/4-20 x 3/8” hex head bolts and lock washers (supplied with the dryer) to secure the top of
the rear tilt guard into the bottom of the rear of the tumbler (basket) section.
3) Use the 1/4-20 self-tapping screws (supplied with the dryer) to secure the right hand side tilt guards
and left hand side tilt guards.
Refer to Tilting Guard Panel Reconnection View on page 31.