


25
SECTION III
INSTALLATION PROCEDURES
Installation in a proper location should be performed by competent technicians in accordance with local and state
codes. In the absence of these codes, the installation must conform to applicable American National Standards:
National Fuel Gas Code ANSI.Z223.1-LATEST EDITION and/or National Electrical Code ANSI/NFPA NO.
70-LATEST EDITION, or in Canada, the Canadian Electrical Codes Parts 1 & 2 CSA C22.1-1990 or LATEST
EDITION.
Before installing the dryer, be sure the location conforms to local codes and ordinances.
The dryer must be installed on a sound level floor capable of supporting its weight. Carpeting must be removed
from the floor area that the dryer is to rest on.
IMPORTANT: “The dryer must be installed on noncombustible floors only.”
IMPORTANT: Dryer should be located where a minimum amount of exhaust duct will be
necessary.
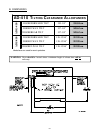
A. REASSEMBLY OF DRYER
IMPORTANT: Always keep the tumbler (basket) section in an upright position when moving
and/or transporting.
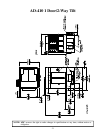
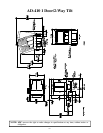
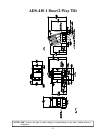
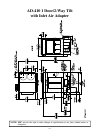
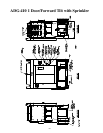
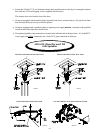
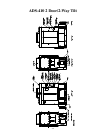
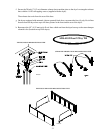
The AD-410 dryer is shipped in two (2) pieces with the tumbler (basket) section separate from the base section.
The tumbler (basket) section will have to be lifted/hoisted onto the base section. Use cables through the eye bolts
on top of the tumbler (basket) section, or use a forklift for the lifting process.
The AD-410 tilting dryer is made with many loading and unloading options. Please refer to the reassembly
instructions on the following pages for your particular style of dryer.
If a steam dryer is shipped in two (2) pieces, the steam coil may have been removed from the top of the tumbler
(basket) section and shipped with the base section. If this is the case, carefully lift the steam coil on to the top of
the tumbler (basket) section with the steam pipe connections facing towards the right hand side of the dryer and
bolt the coil to the top of the dryer with the 1/4” (6.35 mm) hardware supplied. There are three (3) panels that
cover the front, right hand side, and rear of the steam coil. Fasten these into position also. Reconnect the steam
pipe and condensate pipe unions to the coil. These pipes run down to the flex hoses in the base section.