


© Published by permission of the copyright owner – DO NOT COPY or TRANSMIT
7
F232179
Programming
NOTE: The machines are factory-programmed
with basic cycles to make the units operational
without programming at the installation.
Entering Program Mode
1. Open machine lid.
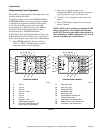
2. Locate Program/Run switch on the computer
board. This is accessed through a cutout in the
metal control unit cover. This switch protrudes
from the rear of the electronic control unit cover.
3. Flip switch to the left (as seen from the front of
machine) to enter PROGRAM Mode.
4. Display will show “0000” or temperature
(depending on version of control).
Determining Firmware ID Code
1. Turn on the main power source (circuit breaker or
cut-off switch on wall).
2. Display will show Firmware ID code (i.e.,
“o2IF”, “ovUF” and etc…).
3. Record Firmware ID Code for future reference.
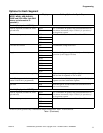
Setup Mode (For Models With Firmware ID
Code “o2IF”, “ovUF”, “ovIF”, “o2UF”,
“C2PA” and “o2PA”)
NOTE: In SETUP Mode, certain machine
functions can be configured. The settings in this
mode are related to how the machine is equipped
from the factory. Usually, these would not be
changed in this field.
NOTE: Enter SETUP Mode through the
PROGRAM Mode.
1. Press (*) keypad. Display will show “FAr” or
“CEL”.
NOTE: This selects whether temperatures display
in degrees Fahrenheit (F) or Celsius (C), if control
is equipped with a temperature sensor. Change
selection by pressing (∧)or(∨) keypad.
NOTE: Changing degrees “FAr” or “CEL” only
has an effect if the control has a temperature probe
connected and/or heat capability.
2. Press START (Enter) keypad.
3. Model will display “HEAt” or “noHt”. Change
the selection by pressing the (∧) or (∨) keypad.
4. Press START (Enter) keypad to continue to the
next step.
NOTE: If set for “HEAt”, the control has heat
capability enabled. The washer-extractor MUST
have electric or steam heat and a temperature
probe. If display shows “noHt” or if the message
“HEAt” or “noHt” does NOT display, the control
does NOT have heat capability.
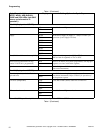
5. Certain models will display “EFIL” or “ESUP”.
For these models, the control provides a spare
output (for certain models). The spare output can
be set up to control an extra fill valve (“EFIL”),
with the ability to fill to a programmable water
level (just as for regular fills), OR the spare
output can be set up to control an extra chemical
supply signal (“ESUP”).
6. Press START (Enter) keypad.
7. Certain models display “bEEP” (control sounds
beeper during Add Bleach [Supply 2]) or “nobP”
(control does NOT sound beeper during Add
Bleach [Supply 2]). Change selection by pressing
(∧) or (∨) keypad.
8. Press START (Enter) keypad.
NOTE: If “EFIL” or “ESUP” does NOT display,
the extra fill capability is NOT present. If either
message does display, change the selection by
pressing the (∧)or(∨) keypad. Press START
(Enter) keypad to return to PROGRAM Mode.
Refer to “Programming Cycle Segments” section
for additional information.
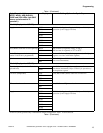
9. “Adv” or “noAd” will display. If “Adv” is set,
control will advance to the next step when (∧)
keypad is pressed during a regular cycle. If
“noAd” is set, control cannot advance during a
regular cycle, but can advance during the factory
test cycle when (∧) keypad is pressed.
10. Press START (Enter) keypad to continue to next step.
11. “PtI
n” or “EtIn” will display. “PtIn” means
control will display remaining time in a cycle
without fill and drain times. “EtI
n” means
control will display an estimated remaining time
in a cycle including times for a fill and drain.
Press the (∧) or (∨) keypad to change “PtI
n”/
“EtI
n” selection.
12. Press START (Enter) keypad to continue to the
next step.