


© Published by permission of the copyright owner – DO NOT COPY or TRANSMIT
Programming
21
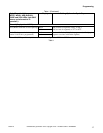
F232179
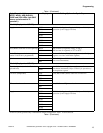
38. Press the (∧) or (∨) keypad to alter the selection
or START (Enter) keypad to continue.
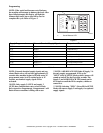
The leftmost supply compartment (as seen from front
of machine), which can be used for detergent, flushes
during fill cycles whether Supply 1 option is enabled
or disabled. When Supply 1 option is enabled, Supply
1 (S1) output energizes and is available for external
chemical supply if desired. The Supply 2 option
controls the middle compartment, which can be used
for bleach. Supply 3 and Supply 7 options control the
rightmost compartment, which can be used for fabric
softener. Supply 4, Supply 5 and Supply 6 options
control external chemical supplies, as desired.
NOTE: For additional assistance, refer to
installation instructions.
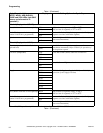
Heated Models Only
39. Display shows temperature in degrees F or C.
Display will show degrees F if configured for
“FAr” in SETUP Mode, or degrees C if
configured for “CEL” in SETUP Mode. Range is
80°F to 205°F, or 00F (no heat for segment), or
27°C to 95°C, or 00C (no heat for segment).
40. Press the (∧) keypad to increase, or (∨) keypad
to decrease temperature. Temperature changes in
one-degree increments.
The control will energize heat and pause cycle timing
for up to 40 minutes until the programmed temperature
is first reached.
NOTE: If temperature not reached after
40 minutes, control resumes cycle.
After cycle resumes, control will attempt to maintain
programmed temperature if it senses water in the
machine.
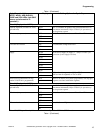
NOTE: Temperature display applies ONLY if
machine is configured for “HEAt” in SETUP
Mode. Machine must be equipped with electric or
steam heat and a temperature sensor. If configured
for “noHt” (no heat capability) in SETUP Mode,
temperature display does not appear in the
segment. After temperature setting, control will
skip to “drAI”/“nodr” or Spin Time, depending on
version.
41. If display shows “drAI”/“nodr” during segment
programming, a drain step option can be selected.
Select “drAI” for a drain step followed by an
optional spin. Select “nodr” for no drain step.
NOTE: The machine will proceed directly to the
next segment if “nodr”.
42. Change the selection by pressing the (∧) or (∨)
keypad.
43. Press the START (Enter) keypad to continue.
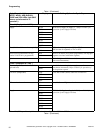
44. If “drAI” is selected (or if your model does not
provide the option of selecting “drAI”/“nodr”),
the display will show “SPIn” one second, “tI
nE”
one second, and then the time for spin: “00” (no
spin) for 30-240 seconds IF you are in Rinse 1, 2,
or 3.
45. If you are in Rinse 4, the time for spin will show
0 or 1-10 minutes.
46. Change the selection by pressing the (∧) or (∨)
keypad.
47. Press the START (Enter) keypad to continue.
48. Then enter the next segment (rIN2, rIN3 or rIN4
or exit if rIN4 is complete).
IMPORTANT: The spin time in Rinse 4 is
programmed in minutes (0-10 minutes, in
one-minute increments), while other spins are in
seconds to allow for shorter times (such as
45 seconds). (Rinse 4 segment should usually be
used as the final rinse, even where there may be
fewer than four rinses. Program “00” time for
preceding rinses you wish to exclude.)
49. Display shows “0000” or “tSFL” (or temperature
if your machine is configured for Heat).
50. Exit PROGRAM Mode by moving the Program/
Run switch back to the right as seen from the
front of the machine.
NOTE: The SPIN indicator LED will automatically
light during the wash cycle when the last spin
programmed in a cycle is operating (regardless of
which segment).