


© Published by permission of the copyright owner – DO NOT COPY or TRANSMIT
Programming
F232179
20
Heated Models Only
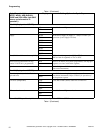
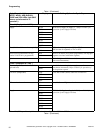
18. Display shows temperature in degrees F or C.
Display will show degrees F if configured for
“FAr” in SETUP Mode, or degrees C if
configured for “CEL” in SETUP Mode. Range is
80°F to 205°F, or 00F (no heat for segment), or
27°C to 95°C, or 00C (no heat for segment).
19. Press the (∧) keypad to increase, or (∨) keypad
to decrease temperature in one-degree
increments.
The control will energize heat and pause cycle timing
for up to 40 minutes until the programmed
temperature is first reached.
NOTE: If temperature not reached after
40 minutes, control resumes cycle.
After cycle resumes, control will attempt to maintain
programmed temperature if it senses water in the
machine.
NOTE: Temperature display applies ONLY if
machine is configured for “HEAt” in SETUP
Mode. Machine must be equipped with electric or
steam heat and a temperature sensor. If configured
for “noHt” (no heat capability) in SETUP Mode,
temperature display does not appear in the
segment. After temperature setting, control will
skip to “drAI”/“nodr” or Spin Time, depending on
version.
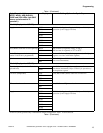
20. If display shows “drAI”/“nodr” during segment
programming, a drain step option can be selected.
21. Select “drAI” for a drain step followed by an
optional spin. Select “nodr” for no drain step.
NOTE: The machine will proceed directly to the
next segment if “nodr”.
22. Change the selection by pressing the (∧) or (∨)
keypad.
23. Press START (Enter) keypad to continue.
24. If “drAI” is selected (or if your model does not
provide the option of selecting “drAI”/“nodr”),
the display will show “SPIn” one second, “tI
nE”
one second, and then the time for spin: “00” (no
spin) or 30-240 seconds.
25. Change the selection by pressing the (∧) or (∨)
keypad.
26. Press START (Enter) keypad to continue.
27. Then enter the next segment (USH2, USH3,
USH4, or after USH4, “rIN1” segment).
Rinse 1 – Rinse 4
NOTE: Programming a time other than “00” for
this step will make the RINSE indicator LED light
while this step is running, but not in PROGRAM
Mode.
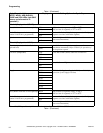
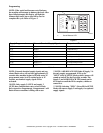
28. The main display shows “rIN1” indicating you
are in the Rinse segment (number will represent
Rinse cycle selected 1-4).
29. Press START (Enter) keypad.
30. Display shows the time for agitation during the
step: “00” (skips segment) or 2-15 minutes. This
is the time after the fill and before the drain and
does not include spin time.
31. Press the (∧) or (∨) keypad to alter the
selection, or the START (Enter) keypad to
continue.
32. Display shows “CFIL”, “HFIL”, “bFIL” (for
Cold, Hot, Both [warm]) or “EFIL”.
33. Press the (∧) or (∨) keypad to alter the
selection, or the START (Enter) keypad to
continue.
NOTE: Extra Fill (“EFIL”) possible only if
configured for “EFIL” in SETUP Mode. If
configured, a third valve can be controlled.
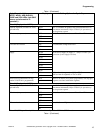
34. Display shows “LO”, “
nEd”, or “HI” for Low,
Medium, or High water level, respectively.
35. Press the (∧) or (∨) keypad to alter the
selection, or the START (Enter) keypad to
continue.
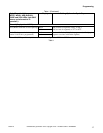
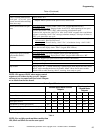
36. Display shows “SUP0”, “SUP1”, “SUP2”,
“SUP3”, “SUP4”, “SUP5”, “SUP6” or “SUP7”.
Refer to Table 2 for operation of each Supply
selection.
37. Press the (∧) or (∨) keypad to alter the
selection, or the START (Enter) keypad to
continue.
NOTE: “SUP5” and “SUP7” appear ONLY if
control is configured for “ESUP” in SETUP Mode.
If the alternate function is selected (“EFIL”), the
output will function as an additional fill valve
signal with a programmable water level. In this
case, extra supply function would NOT be
available.
NOTE: If programmed for “SUP2”, the ADD
BLEACH indicator LED light turns on and if set
up for “bEEP” the buzzer sounds for the first eight
seconds Supply 2 is on.