


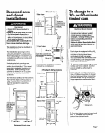

Internal \
exhaust duct
dryel
rear
Y
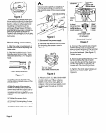
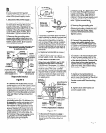
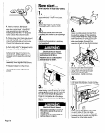
6. [Insert elbow end of duct pieces
through the side opening. Reach
through the access panel openlng
and attach
elbow to the Internal
exhaust duct. Check the length of
stralght duct extending out the
side of the cabinet. If duct extends
too far to make the exhaust duct
connection, mark a line around the
stralght duct one Inch out from the
cabinet. Remove the duct and elbow
and cut the straight pipe to the
length needed. Reinsert the duct
pieces.
Use duct
tape to connect
the elbow to the internal exhaust due
Repeat for the other dryer.
>7. llnsert the plasttc cover Into the rea
exha-ust opening.
8. jRe place the access panels.
9. \Use duct tape to seal all joints.
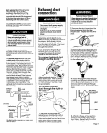
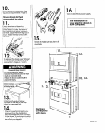
To connect exhaust duct
through the bottom of the
lower dryer only -
Note: You must use a threesection
elbow to connect exhaust duct
through the bottom of the tower
dryer.
I..\ Check that the legs extend one
inch from the bottom of the dryer.
2.
i Remove the lower dryer access
panel by releasing the two locking
clips with a small, flat-blade
screwdrtter. The clips are located
four inches in from each side of-the
access panel. Uft access panel
off the bottom clips and set aside.
Page 8
3.1 Remove duct tape from In .ernal
exhaust duct and the straight duct.
4.j
Remove the screw from the I duct
clip tit attaches the straight duct to
the back of the cabinet. Dep Bss the
clip and remove the straight c uct
using a twisting motion througl i the
rear exhaust openlng.
5.1 Measure from the large en( 1 of the
straight duct and mark at four
inches. Cut the stralght duct to that
6.j Reach through the rear ezd xlust
opening and depress center c tf tabs
on one of the side, plcxtic opt ning
covers.. Remove the cover.
7.1 With a Phillips screwdriver, reach
through the rear exhaust oper ling
and remove the screw that al taches
me cover to the dryer base.
Carefully remove the cover ar d screw
through
the rear exhaust oper ring.
floor Damage
Slide dryers onto cardbaal d or
hardboard before moving
across tloor.
Failure to do so mq.causc!
damage to floor covering.
I
1
8.\, Move dryers into operatinc
pdsltion. Reach through the 2 access
opening and mark the exhau: t
opening location on the floor. Move
dryers out of the operating pc sition.
9.: Cut opening through the fl oar.
::
I
:
I
--
4Aont
of dryer
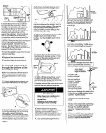
10. :Push the four inch, stralght duct
through the rear exhaust opening
and onto the Internal duct as far
as it will go.
I
.
ol!
*front
d dryer
7 1. j Insert
me
elbow through the
rear exhaust opening. Ins& elbow
into the bottom exhaust openina.
+ tront
of dryer
12.‘Slide the straight du
elbow approximatety one inch.
Use duct tape to seal
both joints.
. sc,ew h&d x-
(fastens against
edge of cabinet)
iili~rt the
bottom exhaust
-cover through
the side exhaust
opening. Put me
cover over
me
rear exhaust
opening with the
tab pointing down
to bottom of dryer.
Insert screw through the
hoie In the
cover that Is on the &tslde of the
cabinet. Ttghten screw.
14jReptace the side exhaust
cover.
15. (Move the dryers into operating
position. Check that the elbow Is
through the bottom exhaust
opening. Replace the access
panel.
763onnect the elbqy toe-must
d&t. Then connect exhaust duct
to exhaust hood or maln exhaust.
Use
duct tape to seal all Joints.