


19
14. Make the necessary vertical alignment and lateral alignment adjustments (follow Basket [Tumbler] Vertical
Alignment and Basket [Tumbler] Lateral Alignment Procedures in
Section Q and Section R).
15. Reinstall both the upper and lower halves of the rear split back guard panels removed in Step #6.
16. Make the necessary belt/idler adjustment (follow Belt/Idler Tension Adjustment Procedure in
Section
K).
17. Reverse Step #1 through Step #3.
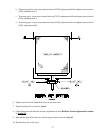
T. TO REPLACE BASKET (TUMBLER) SUPPORT PILLOW BLOCK BEARING
1. Discontinue power to the dryer.
2. Remove the upper half of the rear split back guard panel to either the top or the bottom basket (tumbler),
depending on which basket (tumbler) is being serviced.
3. Loosen pillow block bearing adjustment jam (hex) nuts and bolts (one [1] on each side of bearing support).
4. Loosen the two (2) bearing setscrews.
5. Remove the two (2) sets of nuts, washers, and bolts securing the bearing to the bearing box support, then
remove the bearing.
6. Reinstall bearing and hardware by reversing Step #3 through Step #5.
7. Make the necessary vertical alignment and lateral alignment adjustments (follow Basket [Tumbler] Vertical
Alignment and Basket [Tumbler] Lateral Alignment Procedures in
Section Q and Section R).
IMPORTANT: Make sure proper belt adjustment is made.
8. Reinstall the upper half of the rear split back guard panel removed in Step #2.
9. Reestablish power to the dryer.
U. TO REPLACE BASKET (TUMBLER) SUPPORT FLANGE BEARING
1. Discontinue power to the dryer.
2. Remove the lint drawer and the control/lint door (follow Lint Drawer and Control/Lint Door Removal
Procedures in Section A and Section B).
3. If the lower basket (tumbler) is being serviced, proceed to Step #4.
If upper basket (tumbler) is being serviced, slide the control box out 3/4s of the way and disconnect the
three (3) wire harness connectors located at the back of the control box, then remove the control box from
the dryer.