12
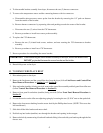
14. The impellor (fan/blower) must now be adjusted/centered in the blower housing. Align the center of the
motor shaft (at impellor [fan/blower]/shaft bearing), so that the center of the motor shaft is exactly 8-
inches (20.32 cm) from the left side panel.
a. Once the impellor (fan/blower) is properly centered, tighten the two (2) nuts of the impellor
(fan/blower)/shaft bearing that were hand tightened in Step #13.
IMPORTANT: Failure to have the impellor (fan/blower) properly aligned can result in the impellor
(fan/blower) being damaged.
15. Reinstall the lower half of the rear split back guard panel removed in Step #4.
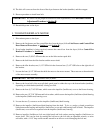
16. The motor must now be realigned and secured in place. To do so, position the motor so that it is exactly
8-inches (20.32 cm) from the center of the motor shaft to the right side panel. Tighten the four (4) nuts
which secure motor to the motor mount loosened in Step #3.
17. Make the necessary belt/idler tension adjustment (follow Belt/Idler Tension Adjustment Procedure in
Section K).
18. Reverse Step #1 and Step #2.
K. BELT/IDLER TENSION ADJUSTMENT
1. Discontinue power to the dryer.
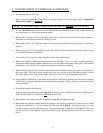
2. Remove the lint drawer, the control/lint door, and the control box assembly from the dryer (follow Control
Box Removal Procedure in Section D).
NOTE: If lower basket (tumbler) is being serviced, the control box does not have to be removed.
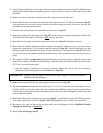
3. To adjust tension, while holding spade tension bolt in place (i.e., with channel lock pliers), loosen the 9/16”
OD locking nut. To increase tension, tighten the inner 9/16” OD nut; to decrease tension, loosen the inner
nut.
NOTE: Approximate proper belt tension - when there is a 1-inch (2.54 cm) space between the idler
adjustment bracket and the first thread on the right hand side of the spade tension bolt.
4. Once proper adjustment is achieved, secure the 9/16” locking nut.
5. Reverse Step #1 and Step #2.


