


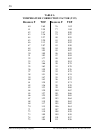


33
Telephone: (508) 678-9000
Fax: (508) 678-9447
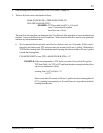
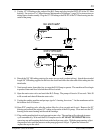
Step 1: Disconnect the power supply and shut off the water supply to the U.V. (ultraviolet) sterilizer. Drain
the water from the U.V. chamber.
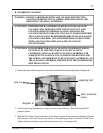
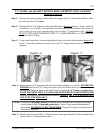
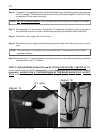
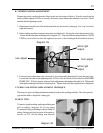
Step 2: Disconnect the U.V. lamp harness (refer to the illustration [diagram 16] below). Insert a small size
screwdriver - very carefully - into one of the slots at the side of the black plastic sleeve bolt and
apply gentle pressure to pry open the snap-in cover of the U.V. lamp harness plug. DO NOT
PULL ON THE CORD TO REMOVE THE U.V. LAMP HARNESS, as it will shorten the
useful life of the U.V. lamp.
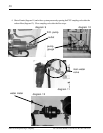
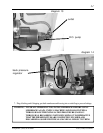
Step 3: Using a small screwdriver, loosen the black plastic sleeve bolt (refer to the illustration [diagram 17]
above). Unscrew by hand and carefully extract the U.V. lamp and quartz sleeve from the U.V.
chamber.
U.V. LIGHT and QUARTZ SLEEVE REPLACEMENT AND CLEANING
INSTRUCTIONS
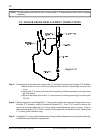
Step 4: Remove the new U.V. lamp and quartz sleeve from the packaging very carefully. IT IS RECOM-
MENDED that the new U.V. lamp and quartz sleeve be cleaned prior to assembly to ensure
maximum performance. Refer to the instructions for cleaning the U.V. lamp and quartz sleeve.
AVOID TOUCHING THE U.V. LAMP and QUARTZ SLEEVE GLASS WITH FINGERS
as skin oils will impair the desired ultraviolet radiation. HANDLE THE U.V. LAMP and QUARTZ
SLEEVE BY THE ENDS ONLY.
NOTE: After the U.V. (ultraviolet) sterilizer has been in use for some time the O-ring may lose its shape
or may adhere to the U.V. lamp and quartz sleeve. A new O-ring (original manufacturer’s
replacement) IS STRONGLY RECOMMENDED. Ensure the O-ring and seating area are
clean prior to assembly.
Step 5: Place the new O-ring onto the U.V. lamp and quartz sleeve approximately 2 inches from the electri-
cal pins of the U.V. lamp and quartz sleeve.
diagram 16
diagram 17