


29
Telephone: (508) 678-9000
Fax: (508) 678-9447
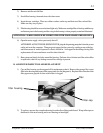
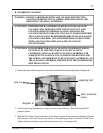
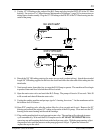
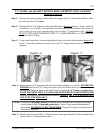
5. Unplug 1/2” OD tubing at the outlet of the R.O. Pump and plug into the OUTLET of the 20” filter
housing. See section C of “Miscellaneous Maintenance Techniques” (page 39) for instructions on
tubing removal and assembly. Plug the 1/2” OD tubing at the INLET of the 20” filter housing into the
outlet of the pump.
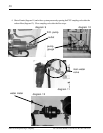
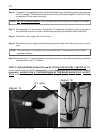
6. Detach the 3/8” OD tubing entering the water storage tank (product tubing). Attach the extended
length 3/8” OD tubing supplied in the kit to the cluster and direct the other end of this tubing into the
drain bottle.
7. Vend enough water from either bay to cause the R.O. Pump to operate. The machine will not begin
to produce water until level is below the refill level switch.
8. Open the main water valve and watch the R.O. Pump. The pump will start in 30 seconds. Wait 30
to 40 seconds and shut off the main water valve.
9. Unplug the vending machine and put up a sign for” cleaning, do not use.” Let the membrane soak in
the solution for 8 to 16 hours.
10.Open PVC sampling valve after the carbon filter for a few seconds and close it. Remove the 20”
housing and reattach the original 1/2” tubing to the outlet of the R.O. pump. Clean and save the 20”
housing for the next cleaning and discard the cartridge.
11. Plug vending machine back in and open main water valve. The machine will go through its purge
cycle automatically. Wait until the R.O. Pump has run for AT LEAST TEN MINUTES before
removing cap and loosening the locknut on the back pressure valve. With the pump running, adjust
the pressure valve until the pressure on the pump gage reads 160 psi. Tighten the locknut and
replace the cap on the valve.