


2-WIRE AND GROUND SYSTEM CONNECTIONS
2-Wire and Ground System
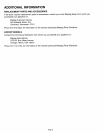
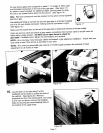
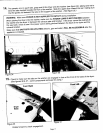
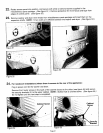
Removethe terminalblockcoverplate.
Insertthe powercordwithan agencylistedstrainrelief (" _
throughtheholeprovidedinthe cabinetneartheterminal _ o
block. Note,a strainreliefmustbe used. __
Donotloosenthe nutsalreadyinstalledonthe terminal Neutral
block. Be suretheyare tight. Use a 3/8 inchdeep well Post" Power
o o Cord
socket. Ground
Secure the powercord ground wireto the terminal block _;Je ,Wire
support using the ground screw. (See figure 30.)
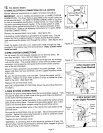
If the power cord has terminals, place the terminals over
the existing nuts on the posts. The neutralwire in power
cord must be connectedto the center (silver colored Power
cord
post of the terminal block. Neutral o f-_ _. • and
Securein place using the nuts providedin the parts (" Ah JF"/- strain
package. If the power cord does not have terminals f relief
usethe cuppedwashers ahead of the nuts.
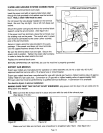
Be sure the terminal block nuts are tight. Securethe Figure 30
power cord in position. Tightenthe strain relief screw(s)
in orderto clamp the strain reliefto the cord.
Replace the terminal block cover.
BEFORE OPERATINGOR TESTING, be sure the machine is properly grounded.
EXPORT GAS MODELS
Export gas models are manufacturedfor operationon either 230/240 volt, 50 Hz or 220 volt, 60 Hz AC
approvedelectrical service with a 15 ampere fuse or circuit breaker.
Export gas models have been manufacturedfor use with natural gas having a higher heatingvalue of approxi-
mately 1025 BTU per cubic foot. Conversion to LP gas with a higher heating value of approximately2500
BTU per cubic foot must be performed by a qualified service technician. A conversion kit is available.
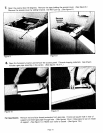
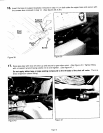
For electric dryers in alcove installation:
MAKING SURE FIRST THAT OUTLET IS NOT ENERGIZED,plugpowercordfor dryerintoan outletpriorto
lifting dryer ontowasher.
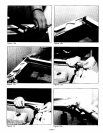
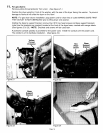
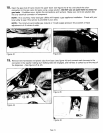
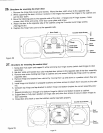
13.Makesure that the exhaust seal is in place and evenwith the end of the exhaust pipe.
(See figures 31 & 32.)
Figure 31 Figure 32 Figure 33
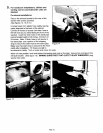
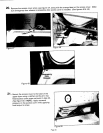
Make sure front tabs are not bent, use screwdriverto straightentabs if bent. (See figure 33.)
Page 16