


6
INSTALLATION INSTRUCTIONS
Accessories
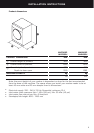
Please check you received the following accessories with your Fisher & Paykel washer.
You will find them inside the drum:
2 x Inlet hoses
1 x Drain hose guide
1 x Installation instructions and user guide
1 x Spanner
1 x Installation leaflet (attached to the top of the washer)
1 x Inlet valve cap
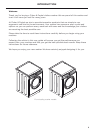
Unpacking
To ensure the best performance from your new washer please follow the instructions below.
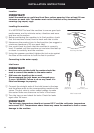
Removing the packaging
1
Remove the outer packaging (including the polystyrene packer and plastic wrapping). All
packaging must be removed prior to use. Ensure these materials are kept out of reach of
children. Note: a small amount of water may be seen inside the packaging and inside the
washer. This is the result of factory testing and is normal.
2
Tilt the machine backwards and ‘walk’ it off the base one foot at a time. Not doing so
may cause damage to your floor and washer.
3
Remove all packaging and accessories from inside the drum.
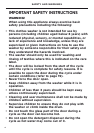
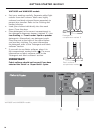
Removing the transit bolts
The clothes washer is fitted with 4 transit bolts at the rear to avoid damage during
transportation.
ImpORTANT!
The 4 transit bolts MUST be removed prior to operation of the machine. Failure to
remove these will result in damage to the machine.
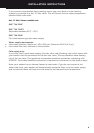
To remove the bolts:
1
Use a spanner or socket to unscrew and remove all four transit bolts at the back of the
washer (C).
2
Pull the black rubber grommets to remove the bolt, grommet and white plastic spacers
from the machine. Keep the transit bolts in case they are required for future transit of the
machine. Never transport the machine without the transit bolts properly fixed in place.
3
Cover the bolt holes with the white plastic plugs which are attached to the machine and
located near each hole (p). Push to clip into place.
C
P
Removing the transit safety bolts