


2
Installation instructions
Unpacking
To ensure the best performance from your new
Smart Drive™ please follow the instructions below.
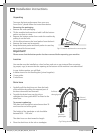
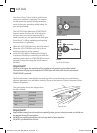
Removing the packaging
1
Remove the outer packaging.
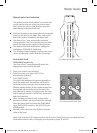
2
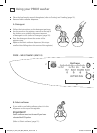
Tilt the machine backwards and walk it off the bottom
packer one foot at a time.
3
Remove the bottom packer from under the machine by
pulling it out the front.
4
Lift the lid and remove the bowl packer from the bowl.
5
Remove the hoses and accessories.
6
Keep the bottom packer and bowl packer in case they
are required for future transit.
Important!
Please ensure that the bottom packer has been removed before operating your machine.
Location
Your washer must be installed on a level surface, and not on any textured floor coverings
(eg carpet, rugs) to ensure that the opening at the bottom of the machine is not obstructed.
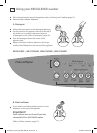
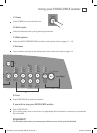
In your clothes washer you will find:
4 rubber inserts for the levelling feet (joined together).
1 hose guide.
2 inlet hoses.
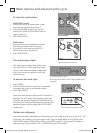
Drain hose
1
Carefully pull the drain hose out from the back
of the machine by pulling the exposed part of
the hose downward and outward.
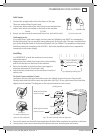
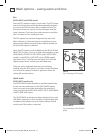
2
To guide the drain hose over the tub or
standpipe the hose guide MUST be fitted to the
drain hose.
To prevent syphoning:
The drain hose should not extend more than 20
mm from the end of the guide.
The height of the standpipe or tub should be
between 850 – 1200 mm.
The drain hose can be trimmed to length.
3
Place the drain hose in the tub or standpipe.
Fig.1 Tilt washer backwards to remove packer
Pull hose
through guide
(20 mm)
maximum
Flex hose
guide apart
Standpipe 850 – 1200 mm
Fig.2 Fitting the drain hose guide
4323_NZ_AU_PAC_GW_MW_Washer_UG11.indd 2 8/10/09 2:45:22 PM