


© Copyright, Alliance Laundry Systems LLC – DO NOT COPY or TRANSMIT
Operation
21
F232201
NOTE: When washing items which may
disintegrate or fragment, such as mop heads or
sponges, use laundry nets to prevent drain
blockage.
IMPORTANT: To prevent out-of-balance
conditions, premature wear or damage to machine
when using laundry nets, use several small nets in a
load.
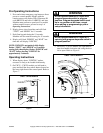
7. When loading is complete, ensure that all fabric
is inside the basket. Then close and lock the door.
8. Add dry supplies are placed in the supply dispenser
compartment cups prior to the start of each cycle.
Liquid supplies can be injected directly into the supply
dispenser by an external chemical supply system.
NOTE: Supply dispenser compartment cups must
not be removed when an external chemical
injection supply system is attached to the washer-
extractor.
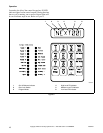
9. Find the cycle number of the desired wash cycle
from the preprogrammed cycle charts in the
Programming section of this manual. Cycle
numbers must be two-digit numbers from
01 to 39.
NOTE: Press keypads at their centers just hard
enough to activate them.
Press the numbers desired on the keyboard and note
that these numbers are displayed after “NEXT.”
When keypads are pressed on the keyboard, a signal
will be heard. If an error is made, press the numbers
again. As numbers are entered, they move from right
to left on the display.
10. To start the selected cycle, press the Start keypad.
If the selected cycle number is not in the control
memory, the display will show “NCYC.” If this
happens, select another cycle. Otherwise, the
display will now show the first step. For
example, if the display reads “HL01,” “HL”
represents a hot fill to low level, and “01”
indicates that this is the first step of the cycle.
As the cycle proceeds, the display will show the
function being executed, the step number, and the
cycle number selected. Pressing the Edit Cycle keypad
while the cycle is running will cause the display to
show the remaining cycle time in minutes. Pressing
this keypad again will return the display to normal.
To begin the cycle at any step other than the first step,
press the Advance keypad to advance through the
cycle to the desired starting point. (The Advance
keypad is enabled at the factory and can be disabled at
the laundry site.) Then press the Start keypad.
It is possible to skip to the next step in a cycle, with the
exception of a drain step: drain steps must be allowed
time to complete.
When the display shows the step desired to begin the
cycle, press the Start keypad.
If the door is not locked, the display will indicate
“CLOSE” and “DOOR.” If this occurs, be sure the door
is closed and locked and press the Start keypad again.
If the LED indicator lights for the control outputs
indicate that one or more outputs are activated but the
washer-extractor is not functioning according to the
output or outputs indicated, contact a service
technician.
As water fills the washer-extractor, one or more of the
indicator lights located to the left of the keyboard will
come on and stay on until the required water level is
reached. LED dots located in the upper left corner of
the last three digits on the right of the display will
illuminate to indicate the water level(s) reached:
• When the indicator dot in the last digit on the
right is lit, the low water level has been reached.
• When the dot in the next-to-the-last digit is lit,
medium water level (optional) has been reached.
• When the dot over the third digit from the right
has been lit, high level has been reached.
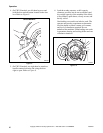
11. The cycle will continue until its completion.
Then the display will read “DONE.”
Be careful around the open door,
particularly when loading from a level
below the door. Impact with door edges
can cause personal injury.
SW025
CAUTION