


© Copyright, Alliance Laundry Systems LLC – DO NOT COPY or TRANSMIT
Installation
13
38970
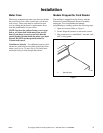
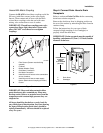
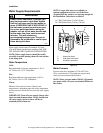
Hoses With Metric Coupling
Connect the BLACK colored hose coupling end of the
fill hoses (with filter screens) to the water supply
faucets. Then connect end of hoses with the brass
colored hose couplings to the hot and cold water
mixing valve connections at rear of washer.
IMPORTANT: Thread hose couplings onto valve
connections finger tight, then turn 1/4 turn with
pliers. DO NOT cross thread or overtighten
couplings.
Figure 5
IMPORTANT: Hoses and other natural rubber
parts deteriorate after extended use. Hoses may
develop cracks, blisters or material wear from the
temperature and constant high pressure they are
subjected to.
All hoses should be checked on a yearly basis for
any visible signs of deterioration. Any hose showing
the signs of deterioration listed above should be
replaced immediately. All hoses should be replaced
every five years.
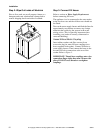
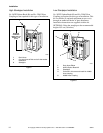
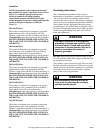
Step 4: Connect Drain Hose to Drain
Receptacle
Refer to section on Drain Facilities before connecting
drain hose to drain receptacle.
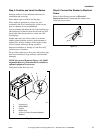
Remove the drain hose from its shipping position on
the rear of the washer by unhooking the hose from the
retainer clamp.
Follow the instructions for your type of drain
receptacle (high standpipe or low standpipe) to
properly install the drain hose.
IMPORTANT: Drain receptacle must be capable of
handling a minimum of 3,8 cm (1-1/2 inch) outside
diameter drain hose.
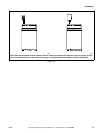
Figure 6
TLW1988N
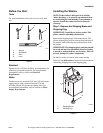
1 Filter Screen (Screen must be facing
outward)
2 Fill Hose
3 Rubber Washer (Plain)
4 Cold Water Connection
5 Hot Water Connection
6 Install this end of hose to valve connections
at rear of washer.
7 Install this end of hose to water supply
faucet. (Black colored coupling for metric)
8 Faucet
HOT
COLD
C
H
2
1
3
4
5
6
7
8
W294I
1 Drain Hose
2 Standpipe
W294I
2
1
RECOMMENDED
STANDPIPE
HEIGHT
92 cm MINIMUM
(36 inches)