


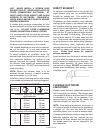
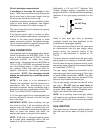
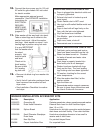

EXHAUST HOOD TYPE
Number of
90° Turns
Maximum length of 4 inch diameter
rigid metal duct
0 54 feet 44 feet
1 43 feet 33 feet
2 36 feet 26 feet
3 30 feet 20 feet
4 24 feet 14 feet
Maximum length of 4 inch diameter
flexible stiff walled metal duct
0 34 feet 27 feet
1 26 feet 19 feet
2 22 feet 17 feet
3 18 feet 15 feet
4 15 feet 13 feet
4 printed in U.S.A.
LINT. NEVER INSTALL A SCREEN OVER
EXHAUST OUTLET. NEVER USE PLASTIC OR
OTHER COMBUSTIBLE DUCTWORK. AT
LEAST ONCE A YEAR, INSPECT AND CLEAN
INTERIOR OF DUCTWORK. FREQUENTLY
CHECK AND CLEAN VENT HOOD TO ASSURE
PROPER OPERATION.
A clothes dryer produces combustible lint and
the area around the clothes dryer should be kept
free of lint. DO NOT STORE FLAMMABLE
LIQUIDS OR MATERIALS NEAR A DRYER.
It is recommended that the dryer be exhausted
to the outside using 4 inch rigid or flexible metal
ducting.
When located in a bedroom, bathroom or closet,
the dryer must be exhausted to the outside.
The stacked washer/dryer can only be exhaust-
ed out the back. A 4 inch vent should be
installed to accept the exhaust from the dryer.
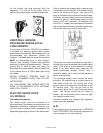
To permit sufficient air circulation under the
exhaust hood, there should be no less than a 12
inch clearance between the bottom of the
exhaust hood and the ground. When possible
the exhaust hood should not exhaust directly
into a window well. DO NOT terminate exhaust
under a building.
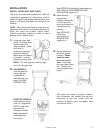
NOTE: Where the exhaust hood is to be
installed through masonry, a special masonry
saw is necessary to cut the hole.
Install the exhaust hood and secure with screws
to the outside wall and seal with caulking compound.
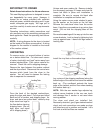
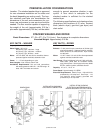
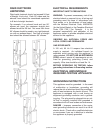
DIRECT EXHAUST
An exhaust hood positioned to line up with the
dryer exhaust pipe can be installed directly
through an outside wall. This would be the
shortest and most direct exhaust method.
To exhaust up, route standard 4 inch diameter
ducting up the recess in the cabinet back using
the furnished retaining strap and screws to get
nearly flush to wall installation. To exhaust to the
side or down, install the furnished 4 inch long
duct with four “S” clips to the inner dryer exhaust,
then use standard 4 inch ducting. This will posi-
tion the dryer about 4-1/2 inches away from the
wall. Flush-to-wall side exhausting may be done
by going above the dryer before going sideways.
When exhausting down, wallboard can be
removed from the wall to get the dryer closer to
the wall by placing the exhaust pipe between
studs. Check local codes for required
exhaust clearances.
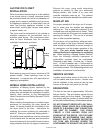
Install ductwork from the dryer to exhaust hood.
All joints must be made so exhaust end of one
pipe is inside the intake end of next pipe. On
flexible metal ductwork, all joints should be
secured with a clamp. DO NOT use sheet metal
screws when assembling rigid ducting. Joints
should be taped.
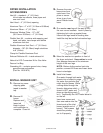
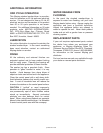
4
inch
2 1/2
inch
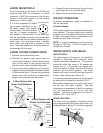
FLEXIBLE DUCTWORK
LIMITATIONS
Flexible metal ductwork should not exceed 34
feet of straight 4 inch ducting. The exhaust hood
is equivalent to 8 feet of duct and each 90° bend
is equivalent to 8 feet. As an example, if an
exhaust hood is used and two 90° bends, the
maximum straight run would be 10 feet.
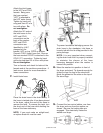
NOTE: If the radius of a bend with 4 inch duct is
12 inches or greater, the bend can be considered
a straight run. No more than three 90° bends
should be used in any run with an exhaust hood.
If flexible metal exhaust ducting is used, the short
extension supplied with this machine can be
secured to the dryer exhaust with the clips and
the flexible metal duct can be clamped to the
short extension.