


13
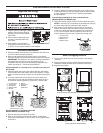
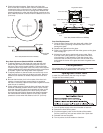
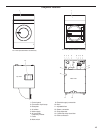
Door Seal Adjustment (Models MFS35 and MFS55)
1. To adjust pressure on the hinge side, open the door and
loosen the door frame bolts clamping the door frame to
the hinge. Take out the square washers. Tighten the bolts.
Loosen the door hinge bolts. Insert one, two or three square
washers between the longitudinal beam and the cross beam
as needed. Tighten door hinge bolts when adjusted.
2. To adjust pressure on the latch side, remove the lock cover
bolts and lock cover. Remove the door lock bolts. Remove
distance lock washers as needed. Replace door lock and
latch.
3. Be sure that the door pin is in the center of the door lock
opening. Loosen the hinge screws slightly to reposition
the door, if necessary. Open the door and re-tighten the bolts
when the pin is centered.
4. Check gasket pressure. Open the door and leave door latch
handle in unlatched position while the door is open. Slowly
close the door until the door latch contacts the roller on the
door lock. Release pressure on the door slowly; the door
should spring back slightly. Measure the distance between
the roller and latch without pressure on the latch. Gasket
pressure is correct when the distance is 0–0.2" (0–5 mm).
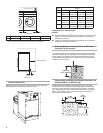
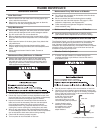
Fuse Replacement
All washers have 2-1A in-line fuses at the back of the washer.
Model MFS55 has an additional 0.5 A in-line fuse.
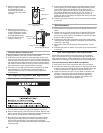
Opening Door Without Power
In case of a power failure, the door may not open.
To open the door without power:
1. Turn off power supply at the circuit breaker or fuse box.
2. Remove the front service panel.
3. Find the emergency cord on the left side of the washer.
Pull the cord rmly until you hear a faint click. Open door.
4. Reinstall front service panel.
5. Turn on power at circuit breaker or fuse box.
Longitudinal beam
Cross beam
Lock cover bolt
Door lock cover
Door
lock
Door frame
bolt
Door glass
Square
washers
Door hinge
bolt
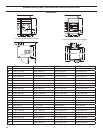
Door Seal (Models MFS35 and MFS55)
Door frame
bolt
Door frame
bolt
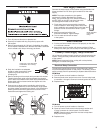
Door Seal (Models MFS18 and MFS25)
Door frame
Door seal
Door glass
Door hinge
bolts
Door Seal (Models MFR18 and MFR25)
Door Seal Replacement
1. Open the door. Remove the door glass with rubber from
the door frame by pushing it toward the drum. Do not
damage the glass.
2. Separate the gasket from the glass.
3. Place a new rubber gasket with the wider groove on the glass
with the edge up.
4. Moisten the seal groove gasket with soapy water. Place
a smooth cord in the groove so it goes around the entire
circumference. Fit the assembly to the door frame. Hold
one end of the cord rmly on the door. Pull the other cord
end toward the center of the glass and work the gasket onto
the door.
4. Check the gasket pressure. Open door and close door
latch on the door. Close the door until the closed door latch
contacts the roller on the door lock. Slowly release pressure
on the door and allow the door to spring back. Measure the
distance between the roller and latch without pressure on the
latch. Gasket pressure is correct when the distance is 0.2–0.4"
(5–10 mm).