


11
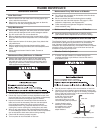
WASHER MAINTENANCE
Maintenance Schedule
After Each Load
■ Remove debris from the wash drum including paper clips,
coins, and other hard items.
■ When not in use, leave the washer door open to allow the
washer to air out and prolong gasket life.
Daily Maintenance
■ Remove water, detergent, and other stains off of the washer
with a soft cloth dampened with a mild detergent solution.
■ Dry with a soft cloth. Do not use abrasives.
■ Remove detergent residue and other contamination off the
door seal with a soft cloth dampened with a mild detergent
solution.
■ Wipe clean the bottom of the door glass of any debris that
may settle there.
■ Remove residue from the soap hoppers with a plastic
scraper. Wipe the hoppers with a soft cloth dampened with
water.
■ Check water and steam inlets for leaks. Correct as
necessary.
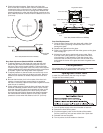
Maintenance Every 500 Hours or 3 Months
■ Observe the washer from the back for one wash cycle.
Be sure that water does not leak out of the drain during
the wash part of the cycle and that it drains freely at the
beginning of extraction. Clean the drain valve if either of
these symptoms are observed.
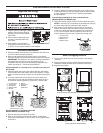
1. Turn off power to washer at the circuit breaker or fuse box.
2. Unlock top cover of washer, remove dispenser screws, and
open top (see Top View on page 15 for location of dispenser).
Remove bolts/screws securing rear panel of washer.
3. Inspect all hoses and connections inside the washer for
leaks and correct as necessary. Remove dust and debris
from inside the washer with a shop vacuum and soft
bristled attachment. Pay particular attention to the motor
cooling ns, inverter cooling ns, cooling fans, and vents.
4. Wipe up any stains with a soft cloth dampened with water
or a mild detergent solution. Be sure that control components
are not exposed to dust and moisture during cleaning.
5. Check that all bolts are properly torqued.
6. Turn on power at circuit breaker or fuse box.
Maintenance Every 1000 Hours or 6 Months
■ Turn off hot and cold water to the washer at the the valves.
Clean water valve screens.
■ Be sure ventilator fans are functioning (some models).
■ Inspect belt and check belt tension. See page 12, “Belt
Inspection, Adjustment, and Replacement”.
■ Check mounting bolt tightness. Retighten if necessary
(xed installation only).
Maintenance Every 2000 Hours or 12 Months
■ Adjust and perform functional test on vibration switch
(see Vibration Switch Adjustment and Function Testing).
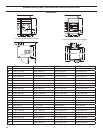
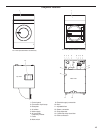
Vibration Switch Adjustment and Function Test
The Vibration Switch is a critical component of the washer that
avoids washer damage during extraction of an unbalanced
load. Vibration Switch adjustment must be performed during
installation and checked annually. The Vibration Switch is located
toward the front of the washer on top of the drum and can be
accessed by opening the top cover.
Vibration Switch Adjustment
1. If washer was just installed, run washer through one
complete extraction cycle without a load so the drum is
at its balance point.
2. Turn off power to washer at the circuit breaker or fuse box.
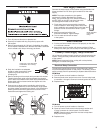
3. Unlock top cover of washer, remove dispenser screws, and
open top (see Top View on page 15 for location of dispenser).
Prop up the front of the cover on all but the MFS18 where
the top panel also has 2 bolts
at the rear of the top panel
and the top needs to be
removed by lifting up on the
rear and sliding the top forward.
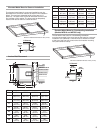
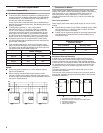
4. Locate vibration switch
assembly. Check oating
arm adjustment. Loosen
the static arm bolts to
adjust distance.
Static arm
1
3
/16"
(30 mm)
Sensor
spring
Floating arm
Switch
Floating arm distance adjustment