


16
DRYER PRE START CHECKS
TERING ROLL SPEED should in-
crease. Turning either knob coun-
terclockwise will decrease the
speed. Make sure the drive chain
tension is properly adjusted and all
sections of the metering rolls ro-
tate. Turn the UNLOAD switch OFF
after these checks are complete.
The bottom auger will continue to
run for 30 seconds after the switch
is turned OFF to allow for cleanout.
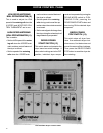
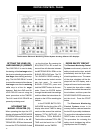
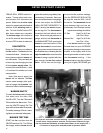
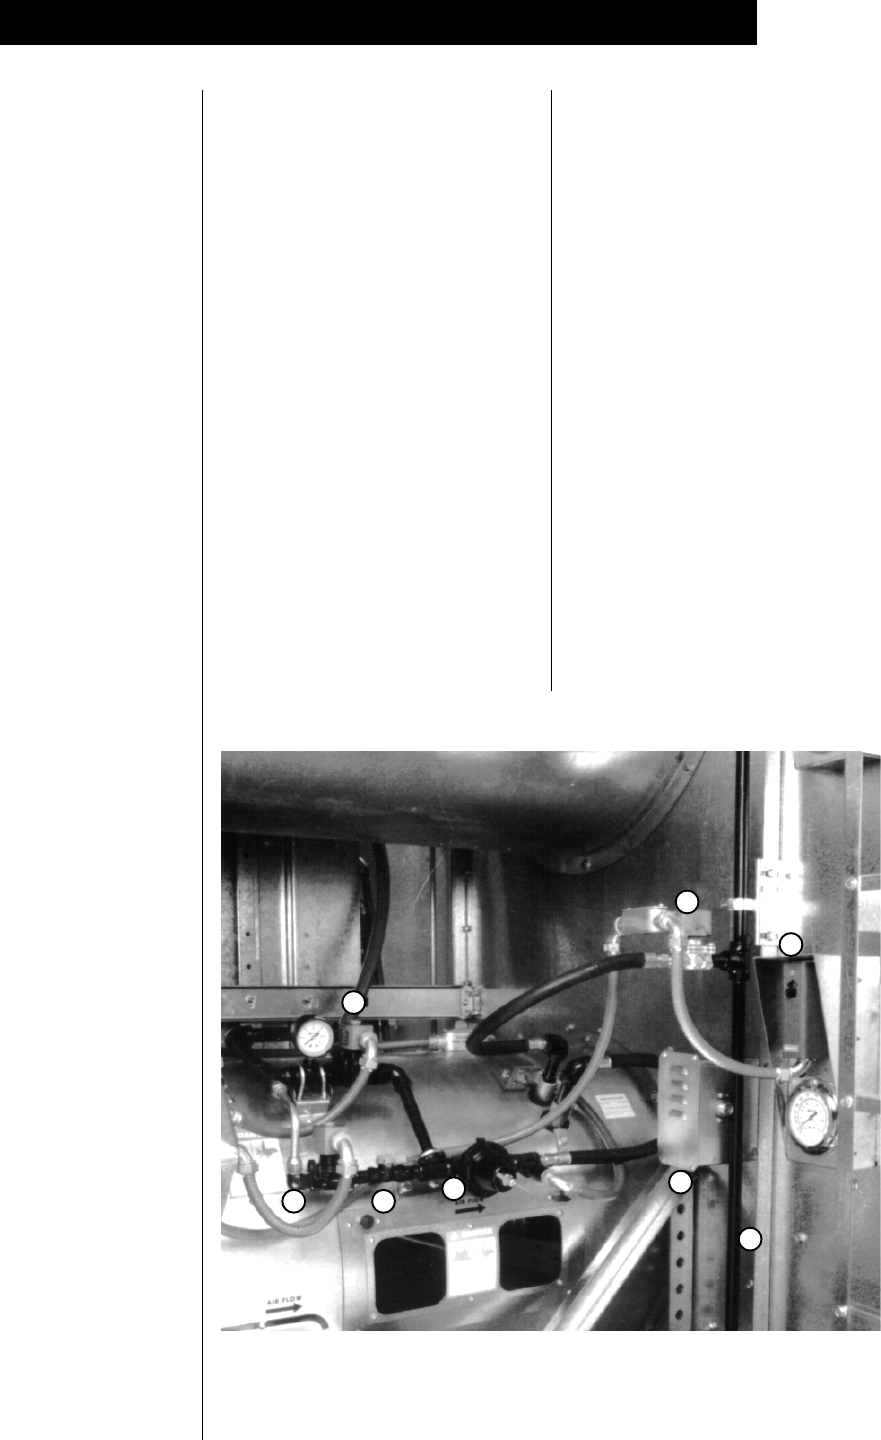
The dryer fan and heater controls featuring: 1-pressure regulator, 2-low-fire
control valve, 3-high pressure solenoid, 4-low pressure solenoid, 5-high-
low fire thermostat (assembly includes thermometer), 6-fuel supply line, 7-
LP solenoid or supply ball valve(NG) and 8-air pressure switch.
3
4
2
1
7
5
8
6
START the fan, and then turn the
HEATER switch to ON. Turn ON the
fuel supply, and the burner should
BURNER TEST FIRE
BURNER SAFETY
To check the burner safety function,
first make sure the main GAS
VALVE is OFF. Turn the FAN switch
ON and allow the fan to start. Then,
turn the HEATER switch ON. The
dryer will shut down after 20 seconds.
The safety message, "Burner 1 warn-
ing flame not detected" will appear.
Bump the FAN switch and observe
the fan rotation. The fan should run
counterclockwise. Sometimes on
three phase models all motors will
run backwards. They can easily be
reversed by interchanging the two
of three power supply wires. Re-
verse the two outside wires, L1 and
L3, and leave the middle one in the
same position.
Note: If the dryer is empty, the
burner will not operate. The fans
cannot create enough static pres-
sure to engage the air switch. You
will receive a loss of airflow message.
FAN SWITCH
ignite after a short purge delay of ap-
proximately 10 seconds. Gas pres-
sure should be shown on the gauge.
At this time adjust the BURNER
HIGH-LOW FIRE THERMOSTAT to
200°F, causing the burner to oper-
ate on high-fire. The thermostat is
located on the front left side of the
dryer. Observe the gas pressure on
gauge, and turn the thermostat to
its MINIMUM SETTING, causing the
burner to cycle into low-fire. As the
burner thermostat is turned down
the gas pressure should also show
a noticeable drop, indicating that the
high-fire solenoid is closed and the
burner is being supplied with less
gas through the low-fire control
valve. At this time set the high-
fire and low-fire pressure settings.
Use the PRESSURE REGULATOR
for high-fire and the BALL VALVE
for low-fire. The thermostat should
cycle between high and low, ap-
proximately 4 to 5 times per minute.
Approximate settings should be:
LP Gas High-Fire 6-15 lbs.
Low-Fire 2-6 lbs.
Natural Gas High-Fire 6-10 lbs.
Low-Fire 1-3 lbs.
If the burner remains on high-
fire and does not cycle, INCREASE
the regulator setting on the propane
models, or the supply valve on the
natural gas models in order to reach
the thermostat setting. If the
burner remains in low-fire and does
not cycle, slightly DECREASE gas