8
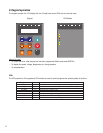
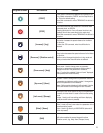
Underline: When words are underlined, they refer to a
key on the keypad.
Quotes: Quote marks are put around words which will be
seen in the display window of the keypad.
Menu Navigation: In the instructions, you will be directed
to press keys to get to certain menu items. In many cases,
the same key will have to be pressed more than once to
get to a value. Note that the display has two lines, the top
line always shows the next HIGHER level of the menu. All
of the menu items referred to in this start up will be shown
in the SECOND LINE of the display. The display on the top
line is for information only and has nothing to do with
entering data. If the instructions say to press the
[Down
arrow] to “Regulation Mode” it means keep pushing the
[Down arrow] until the “Regulation Mode” is displayed in
the second line. If you get confused, refer to the manual
as it shows the complete menu structure.
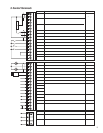
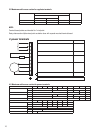
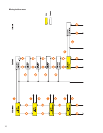
I/O Connections: the drive WILL NOT OPERATE unless
the hardware enable (I/O terminal 12) and the other
interlocks are made. It is suggested to make things simple,
to temporarily connect the terminal board inputs as follows:
Jumper 16 to 18, jumper 19 to 15, jumper 15 to 14, jumper
12 to 13, and connect a simple switch between 13 and 14.
Turning the switch on and off will now enable and disable
the drive (and start and stop it at the same time). If you
have control over the I/O with the connected logic and
can make the same connections with pushbuttons/
contacts, the drive can be enabled with those.
2. Overview
This guide assumes a standard start up using the keypad
for a drive and motor that is to be run in either sensorless
vector or flux vector (with digital or sinusoidal encoder)
mode. It is also assumed that a standard scheme is to be
used for control. In other words, that the drive will be run
from pushbuttons (or contacts) and the speed will be set
from a pot input (or a 0 to 10 VDC source). While the drive
has more modes of operation, this guide will cover most
applications. The manual can be used to help adjust more
complicated configurations.
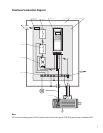
Standard Wiring: see the manual for the standard wiring
configuration. Note that if this is a system designed and
wired by our factory, the set up of the drive (aside from
minor tuning) has already been done.
NOTE:
Memory: There are two memories for set-up parameters.
One is the active memory which is always the one currently
in use by the drive. The other is the permanent memory
which is the one the drive will use if power is lost and then
restored. Note: power up is the ONLY time when the drive
looks at permanent memory. All file uploads and
downloads, all changes, etc. are made only to the active
memory and read from the active memory. The only time
permanent memory is used in any way is when it is booted
into active memory on power up, and when it is changed
to new values by the “Save Parameters” command. When
parameters are changed during set-up, the drive will use
those parameters but unless the “SAVE
PARAMETERS”command is used these changes will not
be permanent. This is an advantage if you are “trying”
something to see how it works and don’t intend to change
your permanent set-up.


