


21
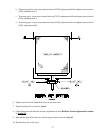
V. TO REPLACE 330º (BURNER) HI-LIMIT SWITCH (THERMOSTAT)
NOTE: The 330º (burner) hi-limit switch (thermostat) is located on the burner box chamber at the rear
of dryer.
1. Discontinue power to the dryer.
2. Remove the lower half of the split back guard panel to either the top or the bottom basket (tumbler),
depending on which basket (tumbler) is being serviced.
3. Disconnect wiring to the 330º hi-limit switch (thermostat).
4. Disassemble hi-limit from burner chamber by removing the two (2) sheet metal screws securing hi-limit to
the burner box chamber.
5. Reverse procedure for installing new 330º (burner) hi-limit switch (thermostat).
6. Reestablish power to the dryer.
W. TO REPLACE SAIL SWITCH
NOTE: The sail switch/damper is located in the area of the gas valve train assembly.
1. Discontinue power to the dryer.
2. Remove the lint drawer and the control/lint door (follow Lint Drawer and Control/Lint Door Removal
Procedures in Section A and Section B).
3. Remove the sail switch/damper rod assembly from the dryer.
4. Disassemble the sail switch bracket assembly from the dryer by removing the two (2) Phillips head screws
located in the lint drawer area.
5. Disassemble the sail switch from the mounting bracket by loosening and removing the two (2) slotted head
machine screws securing the sail switch to the sail switch bracket.
NOTE: When disassembling the sail switch from the bracket, hold on to the twin speed nut located at
the back side of the sail switch bracket into which the screws are threaded.
6. Disconnect the two (2) wires from the sail switch.
7. Reverse Step #3 through Step #6 to install new sail switch.
8. Adjust the sail switch by bending the actuator arm of the switch itself, so that when the sail switch damper
is manually closed, the sail switch activates and when the damper is released, the sail switch deactivates.
9. Reverse Step #1 and Step #2.