


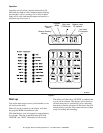

Programming
F232090
26
© Copyright, Alliance Laundry Systems LLC – DO NOT COPY or TRANSMIT
Programming Tutorial
The following procedure guides the programmer
through a complete cycle and allows hands-on
experience for programming cycles. The complete
cycle is listed in the Tutorial Cycle table at the end of
this section.
1. Locate the key-operated programming switch on
the left side of the control module, viewed from
the front. Insert the key and turn the switch to
PROGRAM position. The display will read
“CYC00.”
2. Press the Add Cycle key. The display will read
“ACYC00.”
3. A two-digit number from 01 to 39 must be
entered. Cycle number 39 is recommended
because standard program versions use this short
cycle for performing a chemical supply setup.
4. Press key 3, then key 9, then the Enter key. The
display will read “CYC39.”
a. If the display alternately flashes “EXISTS”
and “EDIT?,” press the Clear/Stop key. The
display will return to “CYC39.”
b. Erase the existing cycle: Press the Erase
Cycle key. The display will show “ECYC39.”
Press key 3, then key 9, then the Enter key.
The display will read “WAIT” for a few
seconds and then “CYC39.”
c. Press the Add Cycle key. The display will
read “ACYC39.” Press key 3, then key 9, then
the Enter key. The display will show “0139.”
5. Enter the desired function for step 1. A natural
choice might be hot fill to low level.
a. Press the Hot key and then the Low key. The
display will read “HL0139.”
b. Press the Enter key. The display will read
“M---S.”
c. Now enter the desired fill time. The
recommended number of minutes is four.
Press key 4. The display will read “4M-00S.”
6. Now press the Enter key. The display will read
“0239,” indicating that the computer is ready for
step 2 of cycle 39.
7. A natural choice for step 2 is the addition of a
supply.
a. To add supply No. 1, press the Supply key
and then key 1. The display will read
“S10239.”
b. Press the Enter key. The display will read
“M---S.”
c. Now enter the desired time in minutes and
seconds for the supply valve to be turned on.
Thirty seconds is the recommended time.
Press key 0 for minutes. The display will read
“0M-00S.”
Now press key 3 and then key 0. The display
will read “0M-30S,” indicating a supply time
of thirty seconds.
8. Now press the Enter key. The display will
change to read “0339,” indicating that the
computer is ready for step 3.
9. If no other supply is required, the next step is to
choose the type of wash desired and assign it a
time. For example, one might choose a wash with
standard reversing action (Wash 1) and a time of
six minutes.
a. Press the Wash key and then key 1. The
display will read “W10339.”
b. Press the Enter key. The display will read
“M---S.”
c. Press key 6. The display will read “6M-00S,”
indicating a wash step of six minutes.
10. Press the Enter key. The display will read
“0439,” indicating that the computer is ready for
step 4.
11. A drain step usually comes next.
a. Press the Drain key. The display will read
“D10439.” (Applications using drain 2 are not
available on 2-speed and 3-speed models.)
b. Then press the Enter key. The display will
read “M---S.”
c. Enter the maximum time desired for the
computer to allow the machine to drain to
empty. The recommended time is one minute.
Press key 1, and the display will change to
“1M-00S,” indicating a drain step of one
minute.
NOTE: The manufacturer does not recommend
more than one minute for a drain step. If the
machine does not drain in the amount of time
programmed, the “EMTY” alarm will be
displayed.
12. Press the Enter key. The display will now read
“0539,” indicating that the computer is ready for
step 5.