


© Copyright, Alliance Laundry Systems LLC – DO NOT COPY or TRANSMIT
Vending
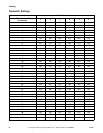
512682
30
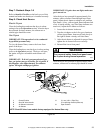
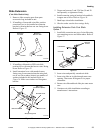
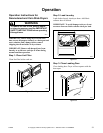
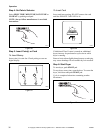
NOTE: During coin slide installation, make sure
activation lever is up and off the switch. Refer to
Figure 28.
6. Check to make sure coin slide is operating
properly by inserting coins and starting a cycle.
The IN USE light will turn on, or flash if it is
already on, to indicate proper operation.
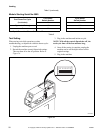
NOTE: To avoid long run-down time (45 minutes
factory default) when testing operation, refer to
Test Setting section.
Installing Extension Onto Coin Slide:
Option 2
1. Install coin slide according to manufacturer’s
instructions.
2. Insert coins into coin slide and slowly push slide
in. Stop before coins fall into coin box. This will
allow installing extension through meter case
service door opening.
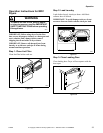
3. Install slide extension onto top of coin slide using
two screws and lockwashers. Refer to Figure 27.
NOTE: Make sure extension lever is above switch
activation lever.
4. Check to make sure coin slide is operating
properly by inserting coins and starting a cycle.
The IN USE light will turn on, or flash if it is
already on, to indicate proper operation.
NOTE: To avoid long run-down time (45 minutes
factory default) when testing operation, refer to
Test Setting section.
Additional Dryer Security
Located on the service door of the dryer is a flat
Phillips head screw. During shipment, this screw is
used to attach the service door to the meter case. For
additional security, this screw can be reinstalled inside
the control hood of your dryer. Following is the
procedure for installing this screw:
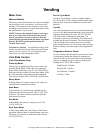
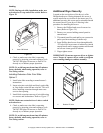
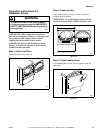
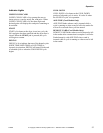
1. Remove the Phillips head screw from service
door. (Refer to Figure 29.)
2. Remove two screws holding control panel to
control hood.
3. Tilt control panel forward and lay on a protective
pad to prevent scratching of cabinet top.
4. Insert Phillips head screw down through double
“D” hole in left rear corner of cabinet top (inside
control hood) until it engages retainer nut located
on left rear corner gusset of cabinet.
5. Finger tighten screw.
IMPORTANT: Do not use a power driver to tighten
screw. Torque of a power driver could over-tighten
screw causing damage to cabinet assembly.
Figure 29
TLW2090N
1 Lever Off Switch
Figure 28
TLW2090N
1
D687I
1 Double “D” Hole
D687I
1