


Replacing/Cleaning the Cooling Coils
WARNING! Hazardous electrical current present.
Disconnect and lock out power before you replace heater elements!
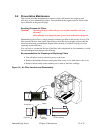
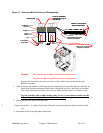
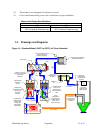
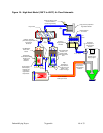
Figure 14: Cooling Coil Location and Disassembly
Note: To clean the cooling coil, use compressed air or a steam cleaner to blow the dust off or
clean any oily residue on the coil.
Replacement Procedures
1. Shut down the dryer, tag out and lock out the controls if necessary.
2. Shut the water off to the cooling coil.
3. Remove the four 10-32 bolts.
4. Gently slide the cooling coil out.
5. Visually inspect the coil for leaks, dirt, and ant sign of volatiles.
6. Blow the dust out, or if the coil is covered with plasticizer, steam clean it.
7. Place the coil back in its housing. Make sure the gasket is OK, replace if necessary.
8. Inset the four 10-32 bolts back in place.
9. Turn the water to the cooling coil back on.
Undo (4) 10-32 Button
Head Screws using 1/8
Allen Wrench
Use compressed air or a steam
cleaner to blow the dust off or clean
any oily residue on the coil.
1" Wide x 1/8" Thick High
Temperature Gasket
Water flow requirement:
If used as an After-Cooler: 3 to 4 GPM @80F.
If used as a Plasticizer Trap: 3 to 4 GPM @ 40F to 45F.
Dehumidifying Dryers Chapter 5: Maintenance 41 of 53