


Page 3
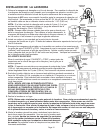
Make any corrections necessary to properly complete the installation.
FAV6800
1. Press “Normal” to turn the washer on.
2. Arrow up to select “Hot/Cold” wash-rinse temper-
ature.
3. Press “Start/Pause” to begin the cycle.
4. Allow the Lid to lock and verify that the Lid has
locked.
5. Allow the washer to fill with hot water.
6. Press “Start/Pause” to pause the cycle.
7. Allow the Lid to unlock, lift the Lid and verify the
washer has filled with hot water.
8. Lower the Lid and Press “Off”.
9. Press “Normal”, Press “Bulky Items”
10. Arrow up to select “Cold/Cold” wash-rinse tem-
perature.
11. Press “Start/Pause” to begin the cycle.
12. Allow the washer to fill with cold water.
13. Press “Start/Pause” to pause the cycle.
14. Allow the Lid to unlock, lift the Lid and verify the
washer has filled with cold water.
15. Lower the Lid and press “Off”.
16. Press “Normal”, Press “Spin Only”.
17. Press “Start/Pause” to begin the cycle.
18. Verify the washer spins. This will take several
minutes, the machine will first drain on slow spin
speed.
19. Allow the Spin cycle to finish, verify that the Lid
has unlocked at the end of the cycle.
20. Press “Off”.
FAV9800
1. Press “Home”, select “Set Your Own Cycle”,
select “Cottons”, select “Hot Wash Cold Rinse”.
2. Press “Start/Pause” to begin the cycle.
3. Allow the Lid to lock and verify that the Lid has
locked.
4. Allow the washer to fill with hot water.
5. Press “Start/Pause” to pause the cycle.
6. Allow the Lid to unlock, lift the Lid and verify that
the washer has filled with hot water.
7. Lower the Lid and Press “Off”.
8. Press “Home”, select “Set Your Own Cycle”,
select “Rinse or Spin Only Cycles”, select “Cold
Rinse & Spin”; press “Start/Pause” to begin the
cycle.
9. Allow the washer to fill with cold water.
10. Press “Start/Pause” to pause the cycle.
11. Allow the Lid to unlock, lift the Lid to verify that
the washer has filled with cold water.
12. Lower the Lid and Press “Off”.
13. Press “Home”, select “Set Your Own Cycle”,
select “Rinse or Spin Only Cycles”, select “Spin”.
14. Press “Start/Pause” to begin the cycle.
15. Verify the washer spins. This will take several
minutes, the machine will first drain on slow spin
speed.
16. Allow the Spin cycle to finish, verify that the Lid
has unlocked at the end of the cycle.
17. Select “Ok”.
18. Press “Off”
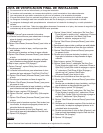
FINAL INSTALLATION CHECKLIST
■■
Instructions and Installation Kit have been removed from tub.
■■
Washer is plugged into electrical outlet and is properly grounded.
■■ Water hoses are connected to the faucet’s with inlet screens and washers.
■■ Water is turned on and checked for leaks at faucet and water valve connections.
■■ Drain hose is properly located into drain facility and is not collapsed or damaged.
■■ Washer has been properly leveled. All legs should be firmly on the floor and leveling leg lock nuts MUST
be tightened.
■■ Test for proper operation by running the washer through the following complete cycle.