


Read this before you start…
PARTS supplied for installation:
Cable tie to secure drain hose to standpipe,
inlet hose or laundry tub
Proper installation is the responsibility of the
purchaser.
SERVICE CALLS PERFORMED AS A RESULT
OF POOR INSTALLATION ARE THE
RESPONSIBILITY OF THE INSTALLER.
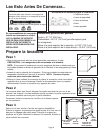
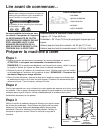
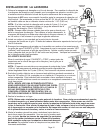
Prepare Washer
Step 1
• Remove the carton by cutting only marked areas of the carton. CAUTION: Hoses are connected to the
washer.
NOTE: If the washer is moved without the carton in place, be sure to keep sharp
edges from damaging the washer cabinet or attached hoses.
• Lift the carton up and clear of the washer. Carefully remove any packaging materi-
als from the outside of the washer. NOTE: Retain the corner posts for later use.
• Untape and raise the washer lid, remove the items shipped in the spin basket. Save the
literature for future reference. Close and tape lid.
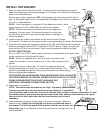
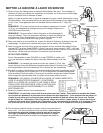
Step 2
With the lid taped shut, lay corner posts on the floor, as shown. Use one corner
post to support the top, and three posts for the bottom. Gently tip the washer on
its back, laying it across the corner posts.
Step 3
Remove the hex head screw at the
rear of the shipping base. Pull plastic
base away from rear feet, and pull
downward to disengage from front
feet. Recycle or discard the plastic
base. Return washer to upright posi-
tion. Untape the washer lid.
2 washers and 2 screens for water hoses
Front Feet
Backguard
Remove hex
head screw
Shipping
Base
Carton corner
posts (stacked on
each other)
Corner
Post
TOOLS needed for installation:
• Cutting knife
• Channel lock
• Nut driver
•Level
• Crescent wrench
Page 1
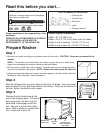
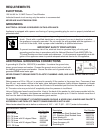
Overall Cabinet Dimensions
Width = 27 1/4" (69.2 cm)
Depth = 29 1/4" (74.3 cm) allow room for hoses.
Height to top of console = 44 3/4" (113.7 cm)
Height to top of open lid = 55 3/4" (141.6 cm)