


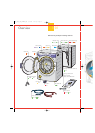

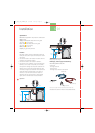
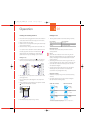

7 Using the Dyson spanner remove the four bolts securing the
top transit bracket.
8 Remove the four screws securing the bracket to the machine
casing and lift out the transit bracket.
• Refit the lid and two screws.
To replace the packaging eg: for moving house, reverse the
procedure described above.
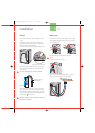
Moving the washing machine
• Ensure the feet are screwed into the cabinet before moving the
machine. See section 03 for instruction on adjusting feet.
•To move the machine, pull out the Rollerjack
TM
handle from
underneath the machine, which will enable you to manoeuvre
the machine easily into your desired position.
• Replace the Rollerjack
TM
slowly because the handle may return
with force.
NB: The Rollerjack
TM
is designed for final positioning only and
not suitable over long distances. Do not push with your foot.
5
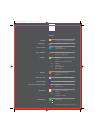
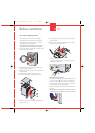
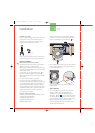
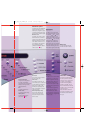
Inner transit packaging removal
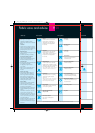
Before installation
4 01
Before installation, check the machine for damage.
A qualified person should always carry out installation.
All packaging must be removed before the machine is
connected to power or water supplies.
Please retain the transit packaging for future use, as it
should be used whenever the machine is relocated.
1 Open the outer door and carefully lift out the foam inserts
from the front of the inner door.
2 Take off the rear panel by removing the seven screws,
using a cross-head screwdriver.
3 Carefully withdraw the foam block and then refit the rear
panel and screws.
4 Remove the two screws from the rear of the lid.
5 Remove the lid by sliding it backwards and upwards.
6 Remove the plug and cable from the transit bracket from
inside the machine.
2
3
5
4
1
7
8
6
8887_CRO2_OPS_INNERS.qxd 5/11/03 3:26 pm Page 5