


Philips Sound Solutions
PSC805 Aurilium™ Sound Processor Users Guide 6
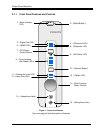
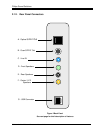
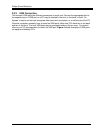
The following is a brief description of all controls and indicators located in the front of the
Aurilium Sound Processor. For an in-depth explanation of each control or indicator refer to
the Using the Hardware Controls chapter of this document.
1. Mute Indicator LED: Indicates when Mute function is active.
2. Mute Button: Toggles all audio output on or off.
3. Digital Out Indicator LED: Indicates S/PDIF Out is enabled/disabled.
4. QSurround Indicator LED: Indicates QSurround is active.
5. QMSS Indicator LED: Indicates QMSS is active.
6. QXpander Indicator LED: Indicates QXpander is active.
7. 3D Effects Control Button: Toggles the 3D Effects on or off.
8. 3D Effects Indicator LED: Indicates that 3D Effects mode is active.
9. Level Indicator Bar Graph LED’s: This set of seven LED’s indicate the level of volume, or
the level of the Fader, Subwoofer, or Input Gain depending on which function has been
selected by the Selector Button (No. 10). When all three function LED’s are off, the bar
graph indicates the volume level.
10. Selector Button: By pushing this button you can select which function is controlled by the
Rotary Control Knob (No. 14) as indicated by the function LED’s (No. 11,12, and 13).
The level of each function is displayed by the Level Indicator bar-graph LED’s (No. 9).
11. Subwoofer Level LED: When lit, the rotary knob controls the subwoofer level as
indicated by the level indicator bar graph LED’s (No. 9).
12. Fader Indicator LED: When lit, the rotary knob controls the level of fader as indicated by
the level indicator bar graph LED’s (No. 9).
13. Input Gain Indicator LED: When lit, the rotary knob controls the level of input gain as
indicated by the level indicator bar graph LED’s (No.9).
14. Multi-Function Rotary Control: This knob controls the level of the volume, fader,
subwoofer or input gain as indicated by the function LED’s (No. 11, 12, and 13).
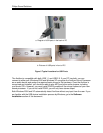
15. Headphone Jack: Attach headphones here.
16. Microphone Jack: Attach microphone here.