


11
1. Leveling Dryer
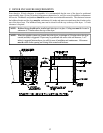
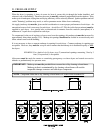
To level dryer, place 4-inch square metal shims (refer to illustration on the previous page [page 10]) or other
suitable material under the base pads. It is suggested that the dryer be tilted slightly to the rear. If more
headroom is needed when moving dryer into position, the top console (module) may be removed.
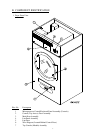
a. To remove top console (module).
NOTE: DO NOT have power connected when separating the top console.
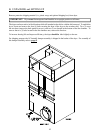
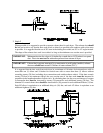
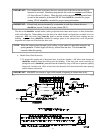
1) Disconnect the ground wire at the rear of dryer (A).
2) Remove the six (6) sets of nuts and washers (B) holding the console (module) to base. (Located with-
in control boxes)
3) Open control door and control panel then disconnect the following:
a) There are three (3) harnesses that need to be disconnected in the right hand electrical box;
(1) Disconnect the 4-pin connector containing both the main door and the lint door switch harness.
(2) Disconnect the 4-pin connector containing the temperature sensor and the rotational sensor on
the microprocessor (computer).
(3) Disconnect the 2-pin connector that contains the tumbler (basket) hi-limit connector on the
microprocessor (computer).
(4) Disconnect the air connection at the compression fitting.
b) On the left side box, disconnect the drive and blower motor wires, along with the 2-pin connector on
the blower motor harness.
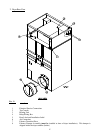
4) Lift the console (module) off of the dryer base (C).
IMPORTANT: The dryer must be transported and
handled in an upright position at all
times.